
Archiving Assistant for Outlook
User guide for everyday users and construction teams
Guide version 3.0 · covers Archiving Assistant for Outlook up to version 1.14.49 (formerly CogSnug Mail Archiver)
1. What Archiving Assistant does
Archiving Assistant for Outlook (formerly called CogSnug Mail Archiver) is an add-in for Outlook that files your email into the right folder in one click. It watches where you put email and learns. After a short while, the folder you would have chosen is suggested for you, so most email takes a single click instead of a drag, a search or a scroll through a long folder list.
Alongside filing it gives you tools to file a whole conversation or every email from one sender, follow up an email later, find everything related to a message, tidy up folders and, for construction teams, work around job numbers. You can mark emails as Held so they stay in your Inbox until you are ready for them. There is also an optional Automation service (Pro) that tidies your mailbox once a week and can put a short report in your Inbox.
Your email stays safe
- Your email stays in your mailbox. The Assistant tools run inside your own Outlook and talk directly to Microsoft 365. Nothing is sent from the add-in to Archiving Assistant. The few things Archiving Assistant remembers for you (your settings backup, what you junked, the Held tags) are kept in your own mailbox.
- Nothing is permanently deleted. Anything Archiving Assistant removes goes to Deleted Items.
- Bulk actions need a confirmation click before they run.
- Undo. You can undo filing for 48 hours.
Archiving Assistant has two levels:
| Assistant | One-click filing, learning, same-sender and conversation filing, find related, undo, categories, To Do and calendar follow-up, snooze, folder tools, Held mail, Junk it, shared mailboxes. Runs in your Outlook only. |
|---|---|
| Automation PRO | Everything above plus a weekly tidy, suggestions learned from what you file, delete or junk, a mailbox report, a Review page and company-wide rules. Automation is a separate service, so it works differently from the Assistant: see Automation for what it reads and keeps. |
Construction mode is included with every plan.
2. Finding Archiving Assistant in Outlook
Archiving Assistant adds a group of buttons to the ribbon of an open or selected email, and a side panel that holds all the tools.
The buttons appear in a CogSnug group on the message toolbar. Exactly where they sit, and how big they are, depends on your version of Outlook. In some versions the whole group is tucked under the three dots (…) or More apps, and the buttons may show as small icons with the same CogSnug logo. The names below are what you will see when you hover over them.
| Archiver panel | Opens the side panel with every tool. |
|---|---|
| File It | Files the email to the top suggested folder in one click. |
| File to… | Opens a small window with your folder list, so you can search and pick a folder. |
| More CogSnug | A menu with: File conversation…, File all from sender…, Undo last filing, Snooze…, Add to To Do…, Add to calendar… |
| Junk it | Moves the email to Deleted Items and remembers it as junk (see Junk it). |
| Undo junk | Puts back what you junked in the last hour. |
| Construction | A menu for construction users with: File to job / file server, Follow up, Related emails, Create job folders. |
| Automation | A menu with: Overview, Review, Rules, Automation settings. Needs the Pro licence. |
You do not need the ribbon at all if you pin the panel: everything on the ribbon is also in the panel.
Pin the panel
Open the panel from the ribbon, then click the pin icon at the top of the panel. A pinned panel follows the email you select, so the suggestions change as you move down your Inbox. If you do not pin it, you will have to reopen it for each email.
Personal Outlook.com accounts
Microsoft does not allow a pinned panel to follow the selected email on personal Outlook.com accounts, and there is no ribbon pinning. Open the email, then use the CogSnug icon beside the reply buttons (or under More apps). It has File It, File to… and the More CogSnug menu. Archiving Assistant works best on Microsoft 365 work or school accounts.
The panel at a glance
The panel has an icon rail down the left: File It, To do, Related, Folders, Held, Junk it, Undo junk (the Assistant), then Overview, Review, Rules, Settings, Company (Automation, Pro), then, if Construction mode is on, Jobs, and then Look, Licence and Help. A thin line separates the filing tools from the two Junk buttons. If you prefer, the tools can sit in a row under the email instead (see Appearance and layout).
3. First-time setup: standard user
Your IT administrator normally installs Archiving Assistant for you. When it has been installed, the CogSnug buttons appear on your ribbon within a few hours (Microsoft can take up to 72 hours to roll an add-in out). If you do not see them, restart Outlook first. If you still do not, see Troubleshooting.
Quick start
- Sign in and accept Microsoft's consent screen (Step 1).
- Pin the panel (Step 3).
- If your plan includes Automation (Pro), open Settings and run the quick guided setup (Step 6). It starts by itself the first time.
- Construction firms: switch on Construction mode (next section).
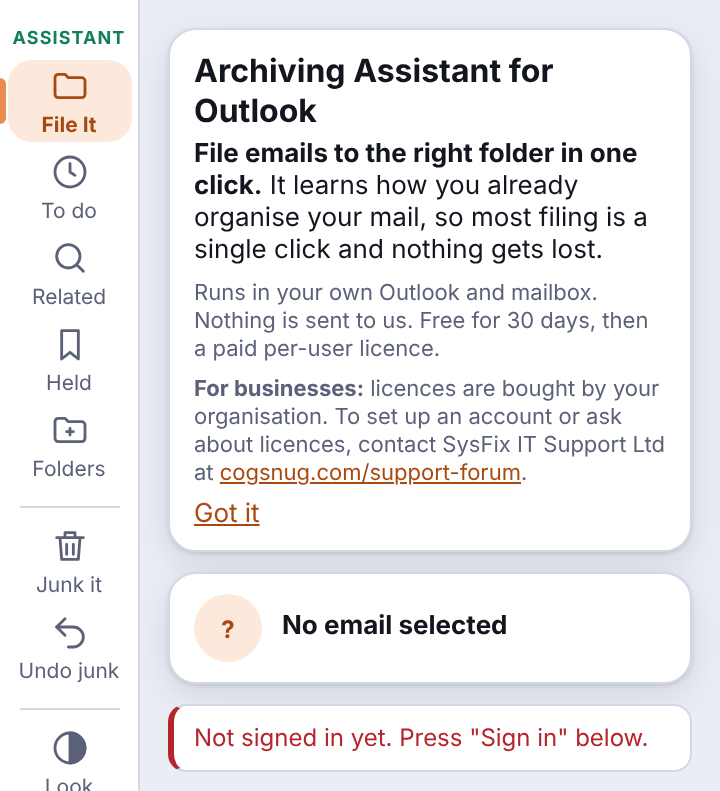
The first time you open the panel you see a short welcome card at the top explaining what the add-in does and who to contact about licences. Click Got it to dismiss it.
Step 1. Sign in and agree
- Select any email and click Archiver panel on the ribbon.
- Click Sign in with Microsoft. Sign in with your work account if asked.
- Microsoft shows a consent screen the first time. Read it and accept. This allows Archiving Assistant to move email in your own mailbox. It is the same permission whether you are signed in on your PC, phone or the web.
Step 2. Let it learn your folders
The first time you sign in Archiving Assistant reads the names of your folders and a sample of what is already filed in them, so it can suggest sensible places straight away. It improves every time you file. If you reorganise your folders later, open Help and use Learn again from my folders.
Step 3. Pin the panel
Click the pin icon (see Finding Archiving Assistant) so the panel follows the email you select.
Step 4. Choose your filing options
On the File It screen, open Filing options and choose what happens to an email as it is filed: mark it as read, clear any flag, and what to do with categories (leave them, clear them, or add one). These are remembered.
Step 5. Choose how it looks
Open Look to pick a colour scheme, an accent colour, the layout, how the side rail looks and how tightly things are spaced (see Appearance and layout). Everything can be changed again at any time.
Step 6. Run the quick guided setup (Automation plans)
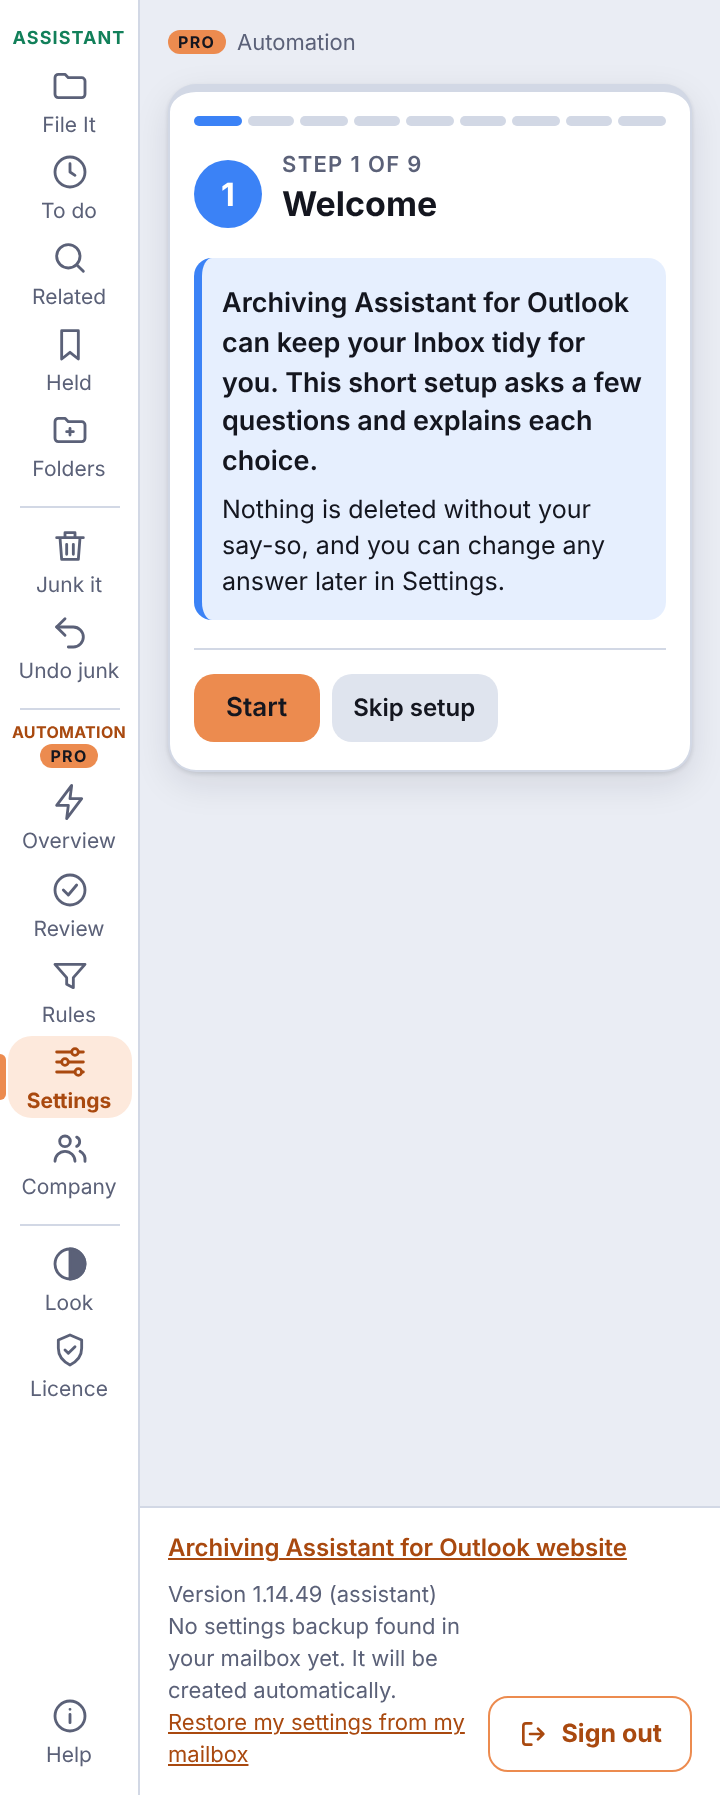
If your plan includes Automation (Pro), Archiving Assistant starts a quick guided setup the first time you open the Settings tab. It is under Automation in the panel's icon rail. It shows Step 1 of 8 and a Welcome card:
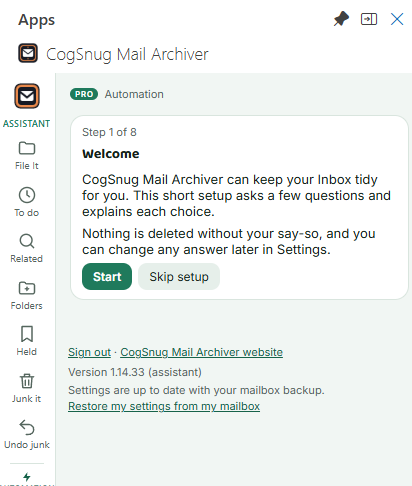
- Click Start to be asked a few questions, one screen at a time, each with a plain explanation. It takes about two minutes.
- Click Skip setup if you would rather go straight to the settings.
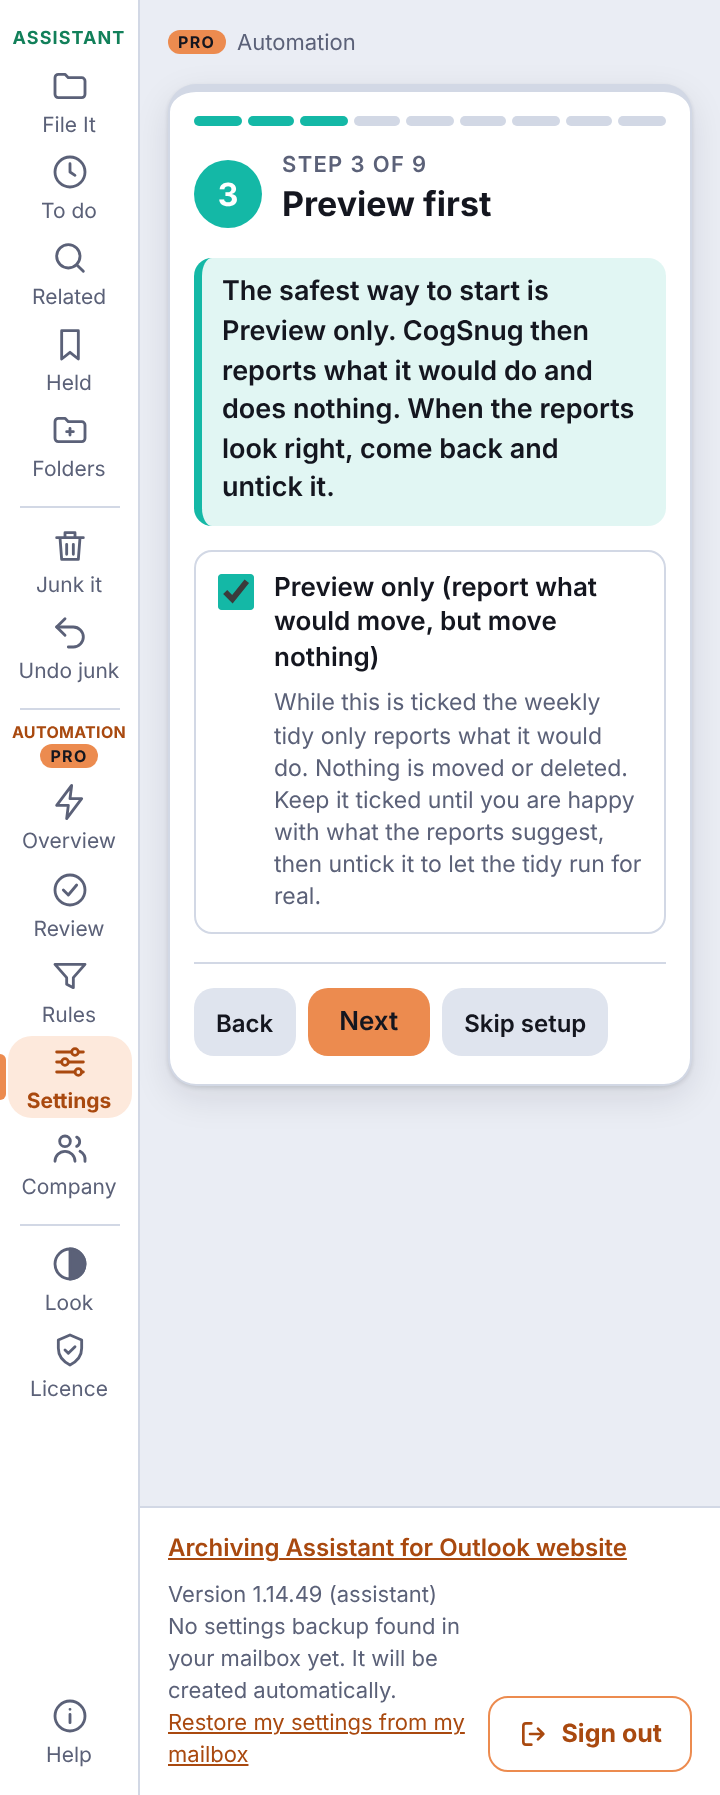
- The safest answer is the default: Preview only. Archiving Assistant then reports what it would do and moves nothing, until you untick it.
- You can run it again whenever you like with Run setup again at the top of Settings.
The second question asks whether you work in construction or want to file email by project (job) numbers. Ticking it turns on Construction mode when you save; you can change it later under Look > Industry.
The eight steps are described in Automation. The setup is remembered for each mailbox on each device, so it can appear again on a new computer or after clearing your browser data. If your plan is Assistant only, there is no Settings tab and no guided setup: filing works as soon as you have signed in.
Your settings are backed up
Archiving Assistant keeps a small backup of your settings in your own mailbox, so if you change computer, clear your browser or have the add-in reinstalled, your settings come back by themselves. The bottom of the panel shows when the last backup happened. If you ever need to bring them back by hand, use Restore my settings from my mailbox at the bottom of the panel.
4. First-time setup: construction user
Do steps 1 to 4 of the standard setup first, then switch on Construction mode. Construction mode makes Archiving Assistant understand job numbers, so it can suggest the job folder, and the right sub-folder inside the job, for each email.
Step 1. Turn on Construction mode
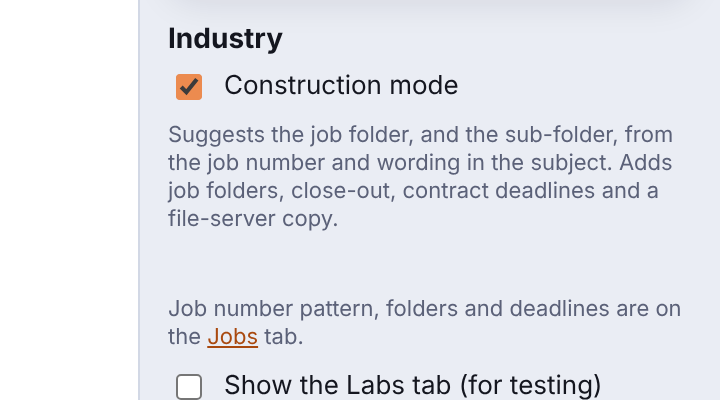
- Click Look in the panel.
- Under Industry, tick Construction mode.
- A new Jobs tab appears in the rail, just above Look. Your Construction settings live there.
Step 2. Tell it what a job number looks like
Type one example of your job numbers, for example P1040, 24-017 or T2201. Archiving Assistant learns the pattern from it, so phone numbers, invoice numbers and other long codes are not mistaken for jobs. If you use more than one style, separate the examples with commas. If you leave it blank, Archiving Assistant accepts any 3 to 6 digit number with an optional 1 to 3 letters in front.
Step 3. Say where jobs live
- Folder that holds your jobs (under the Inbox). The default is
Projects. Each job has its own folder in here, such asProjects/P1040 Riverside Block B. - Folder for finished jobs. The default is
Archive. Closed-out jobs move toArchive/<year>.
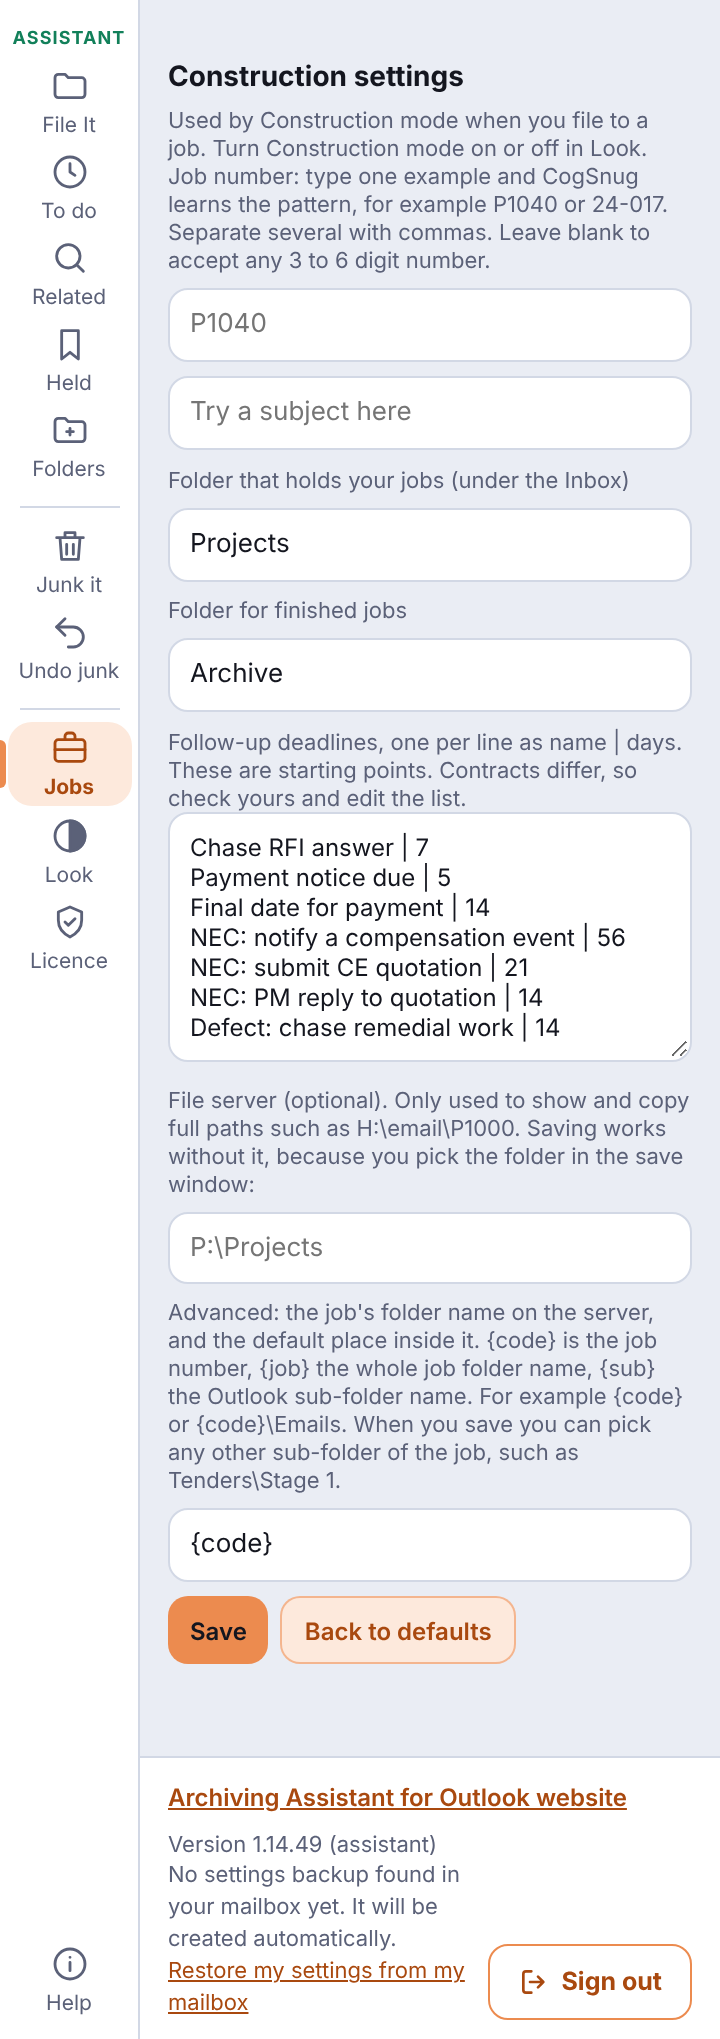
If your IT provider has already set the company defaults, these boxes will be filled in for you. Back to defaults returns to them whenever you want.
Step 4. Contract deadlines (optional)
The Follow-up deadlines box lists reminder names and the number of days, one per line, written as name | days (for example Chase RFI answer | 7). They appear when you follow up an email (see Follow up). They are starting points only. Contracts differ, so check yours and edit the list to match.
Step 5. File server copy (optional)
If your firm also keeps a copy of job emails on a file server, enter the server folder that holds your jobs (for example P:\Projects). Under Advanced you can set the job's folder name and the default place inside it; {code} stands for the job number. The first time you save to the server you will be asked to choose the folder once (see Saving a copy to the file server).
Step 6. Click Save
Click Save at the bottom of the Jobs tab. Your File It screen now shows the job tools.
Step 7. Create your first job folders
Open Folders, type the job number and name, choose a folder set and click Create job folders (see Construction features in detail).
Step 8. Automation plans: run the guided setup
If your plan includes Automation, open Settings and run the quick guided setup if you have not already (see Step 6 of the standard setup).
5. Filing email (File It)
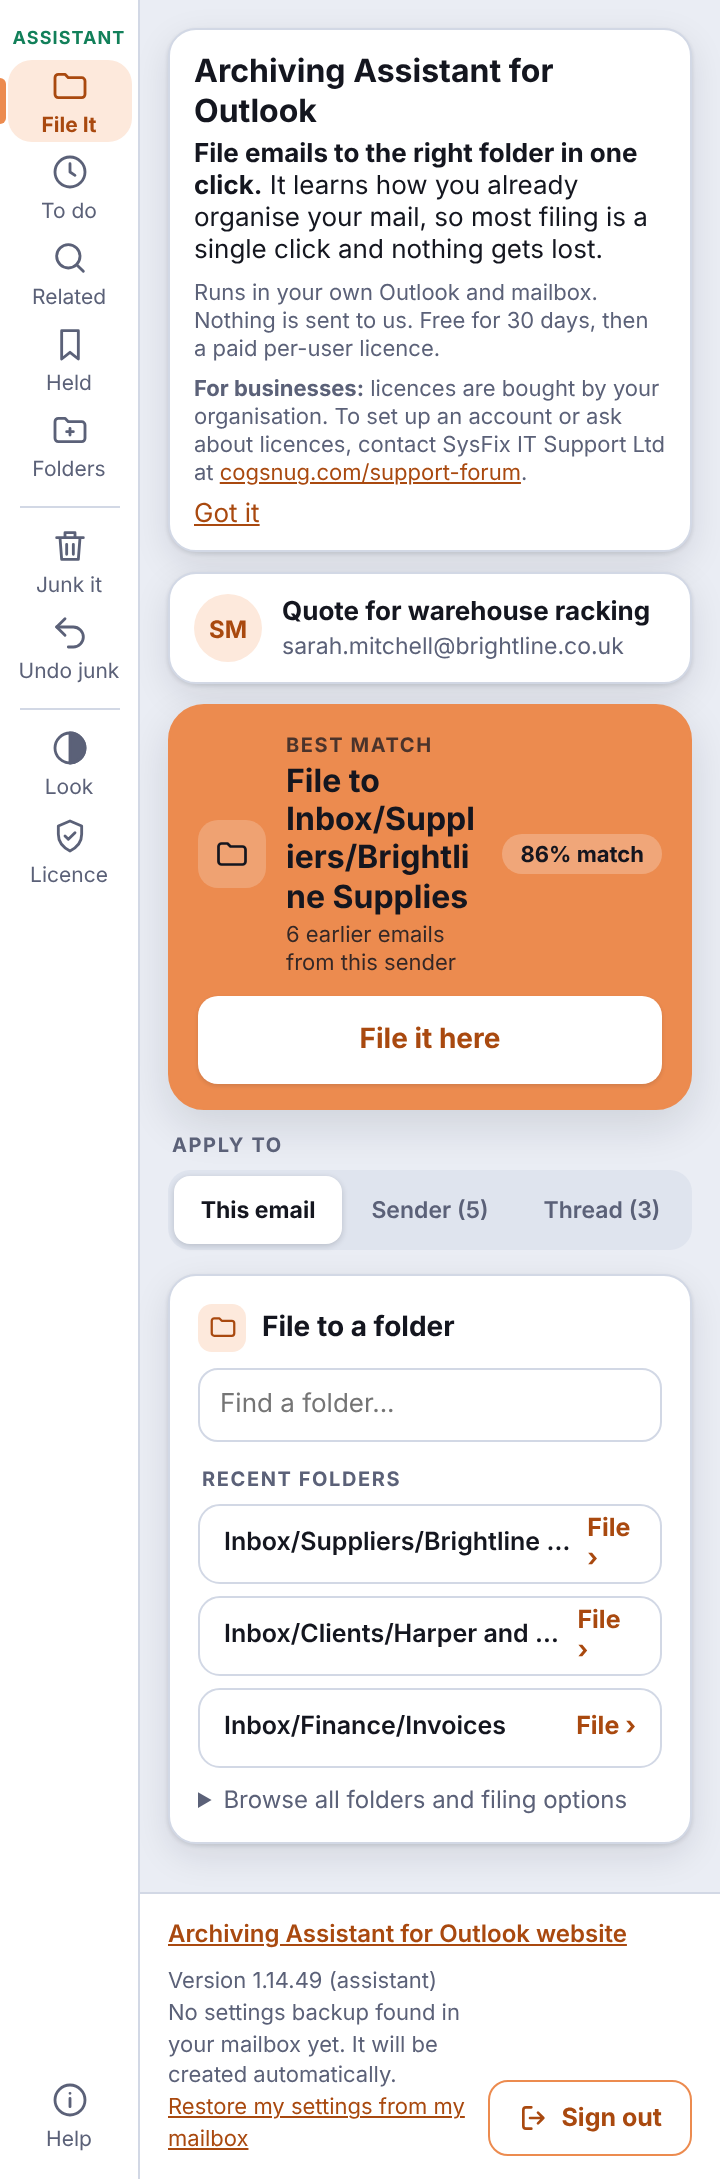
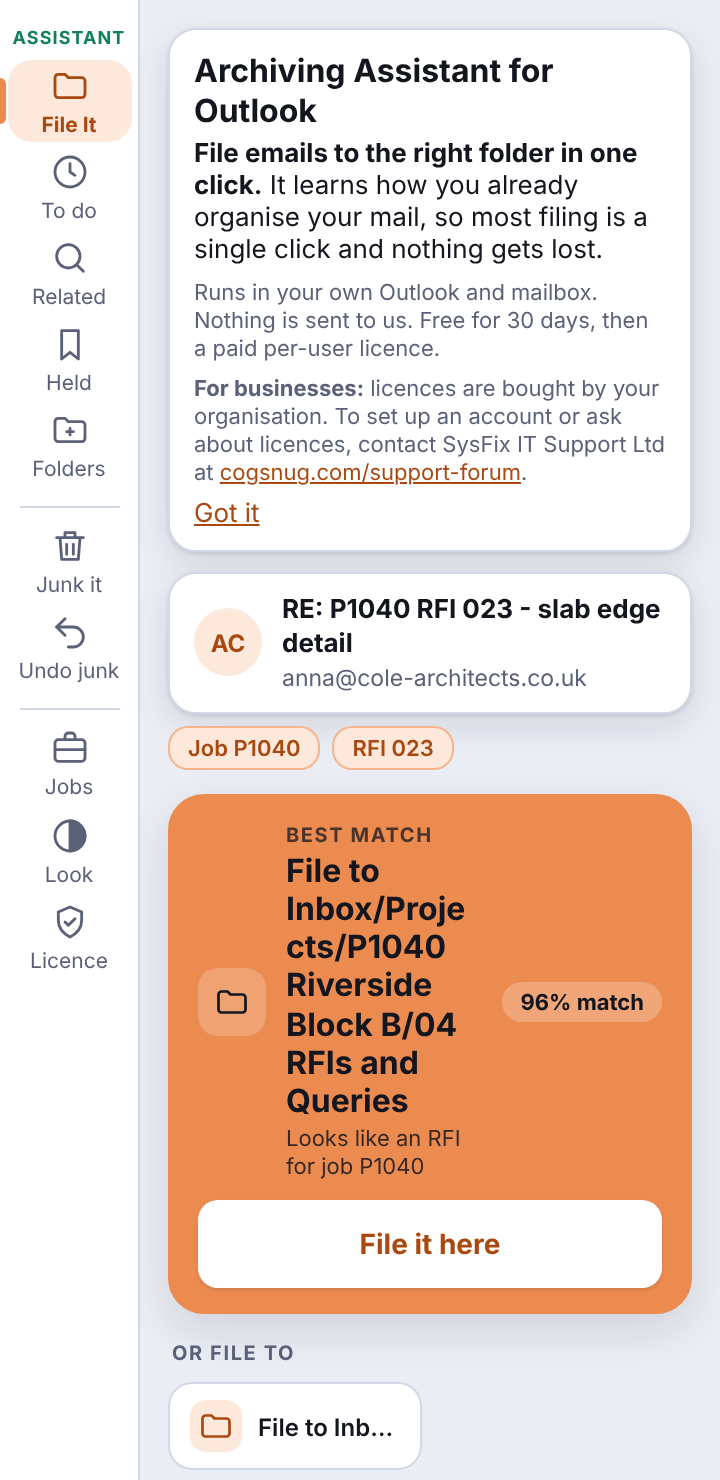
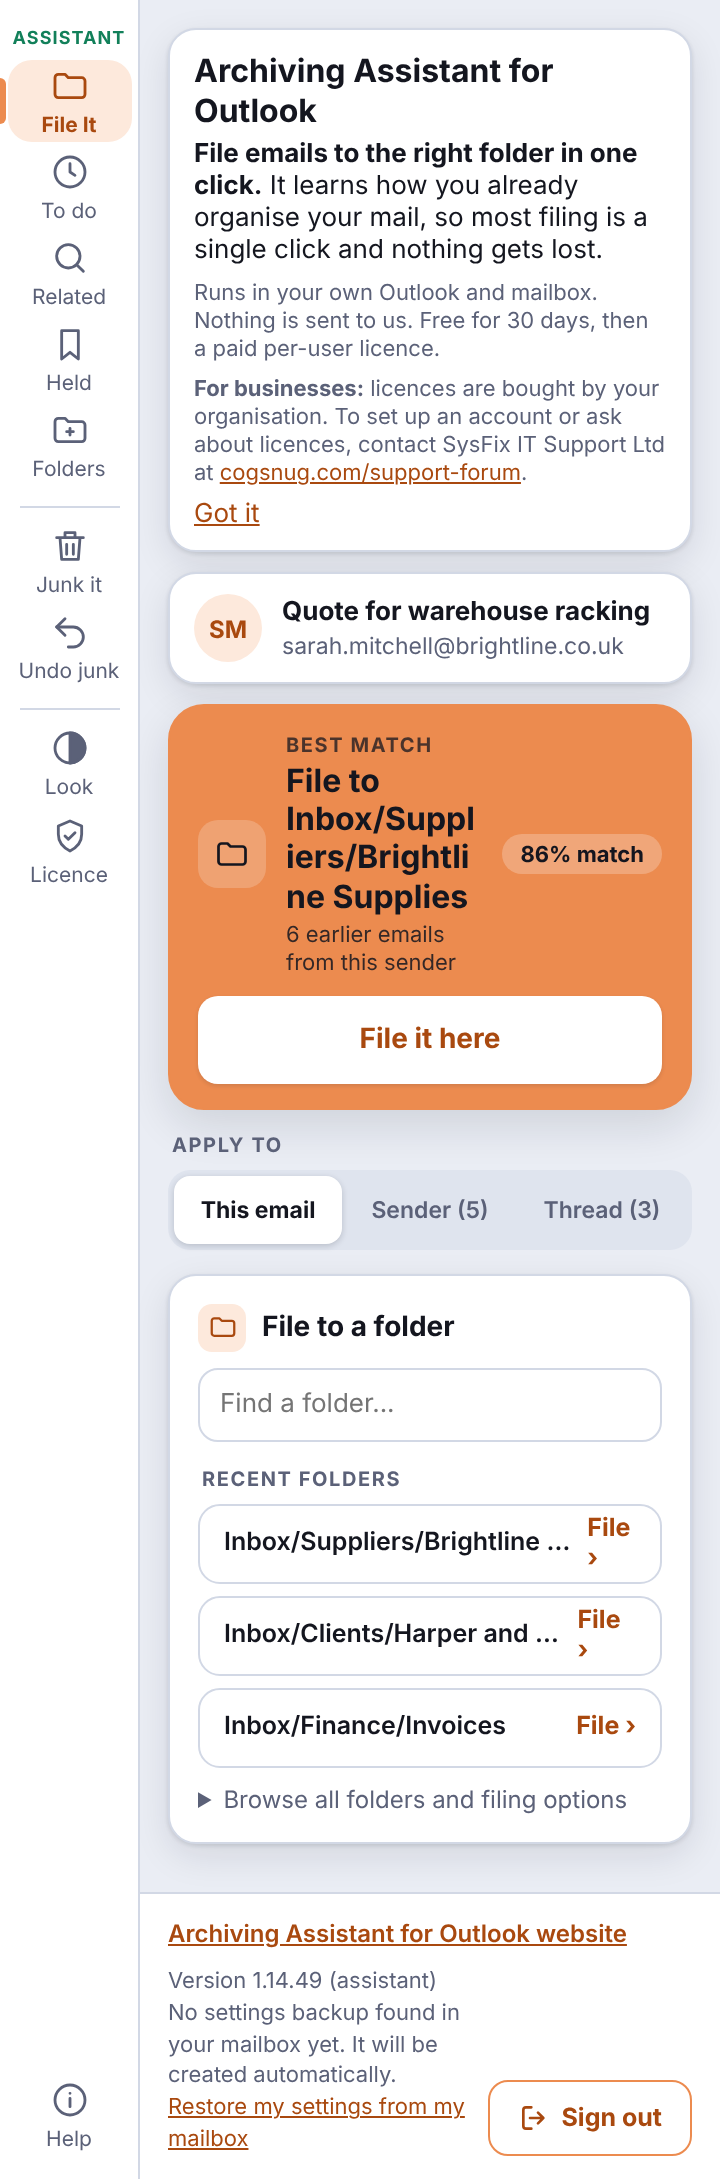
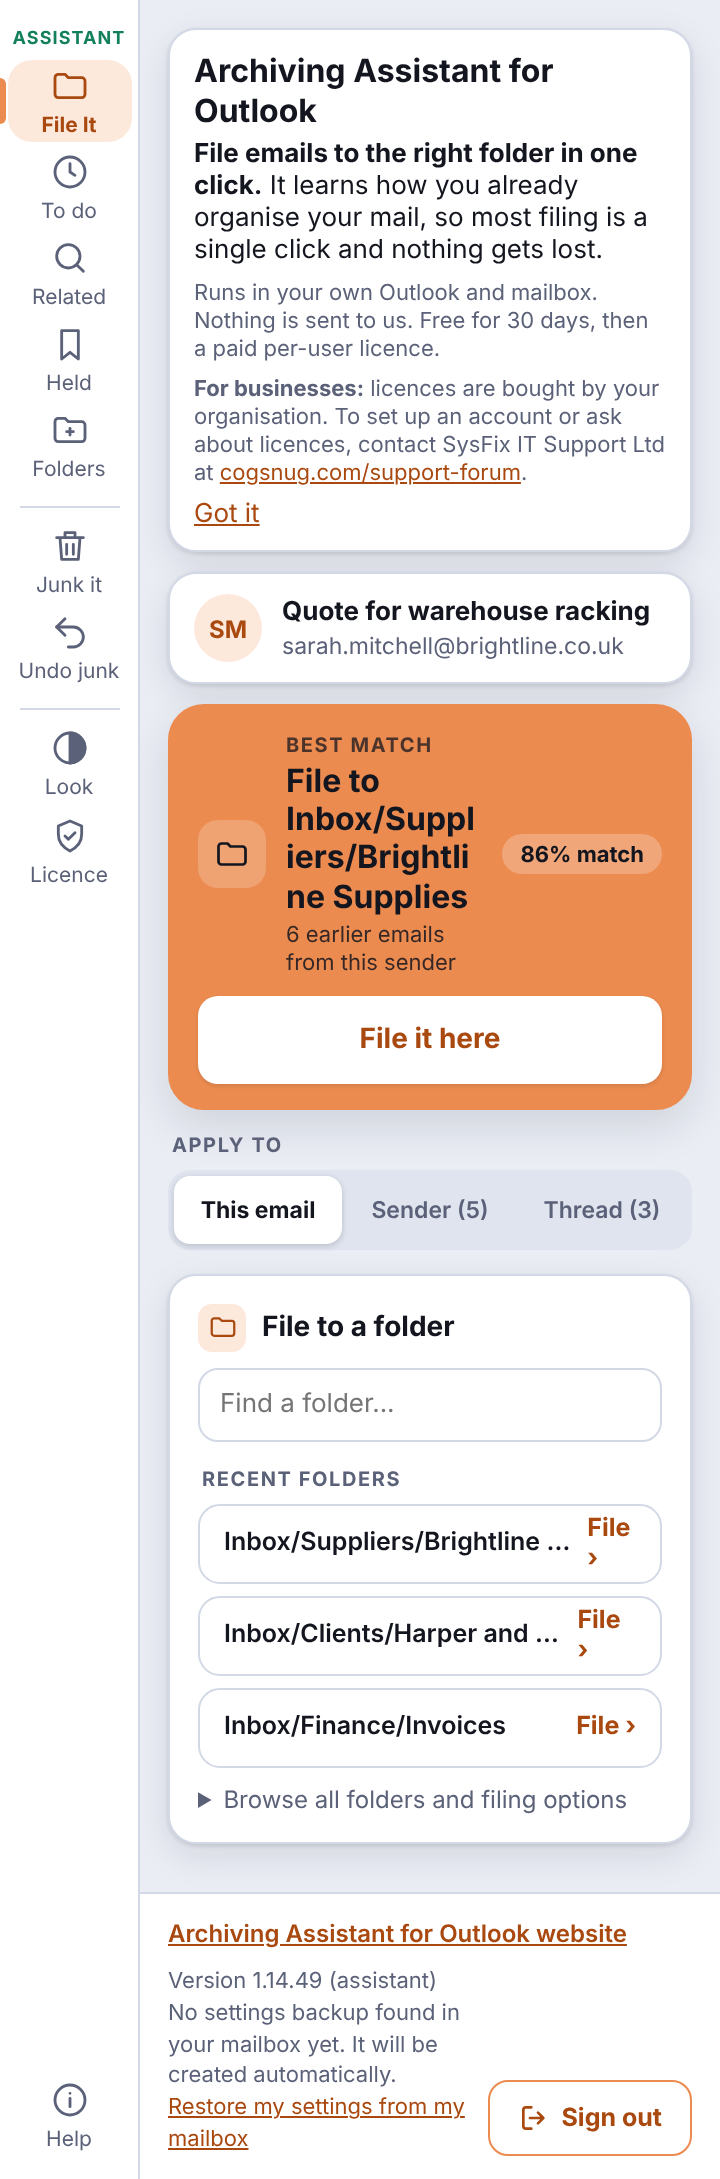
Select an email. The File It screen shows who it is from and the subject, then the folder Archiving Assistant suggests in a coloured Best match card, with a short reason underneath, for example “6 earlier emails from this sender”, and a percentage match. The percentage is based on where you have filed similar mail before. It is a guide, not a promise. Tap the email card at the top to show the whole subject line.
One-click filing
- Click File it here on the Best match card, or click File It on the ribbon, to file to the top suggestion.
- Under Apply to, choose This email, Sender or Thread first, to file just this email, every email from the sender, or the whole conversation. The numbers show how many emails each choice covers.
- If the top suggestion is not right, other suggestions appear underneath. Click one to use it instead.
- Archiving Assistant remembers your choice, and the next email like this is suggested correctly.
Choose a folder yourself
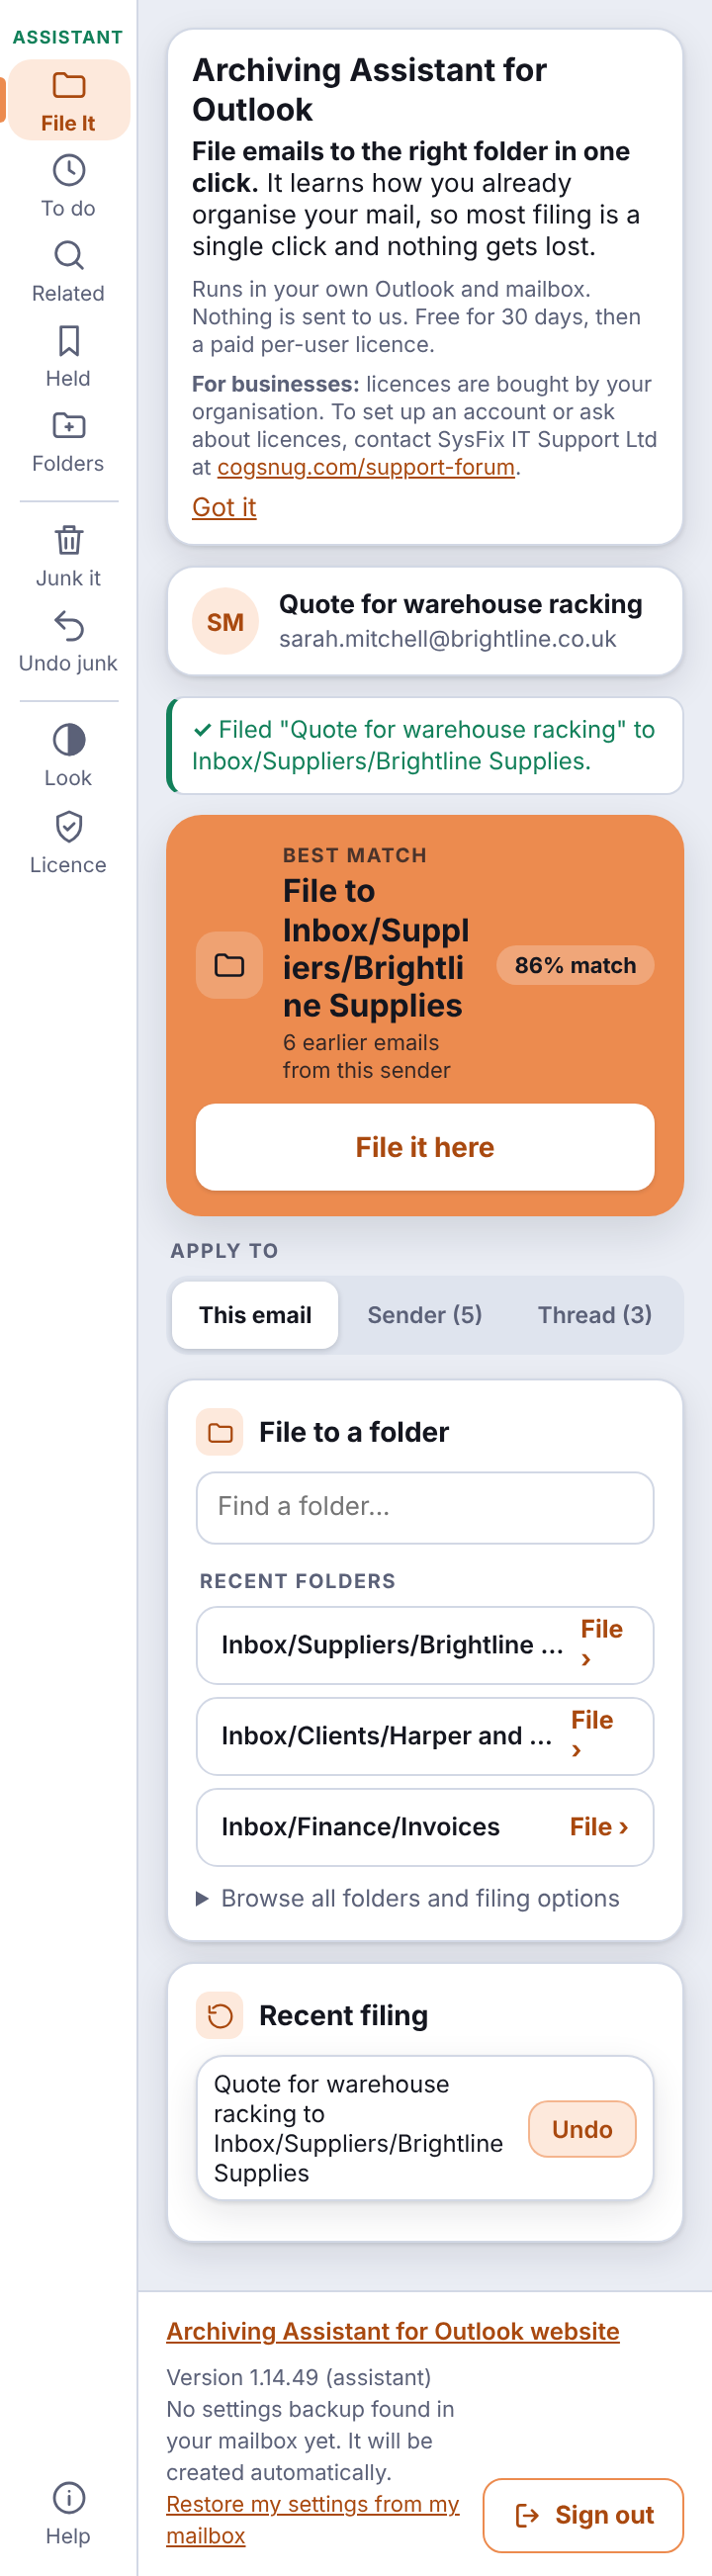
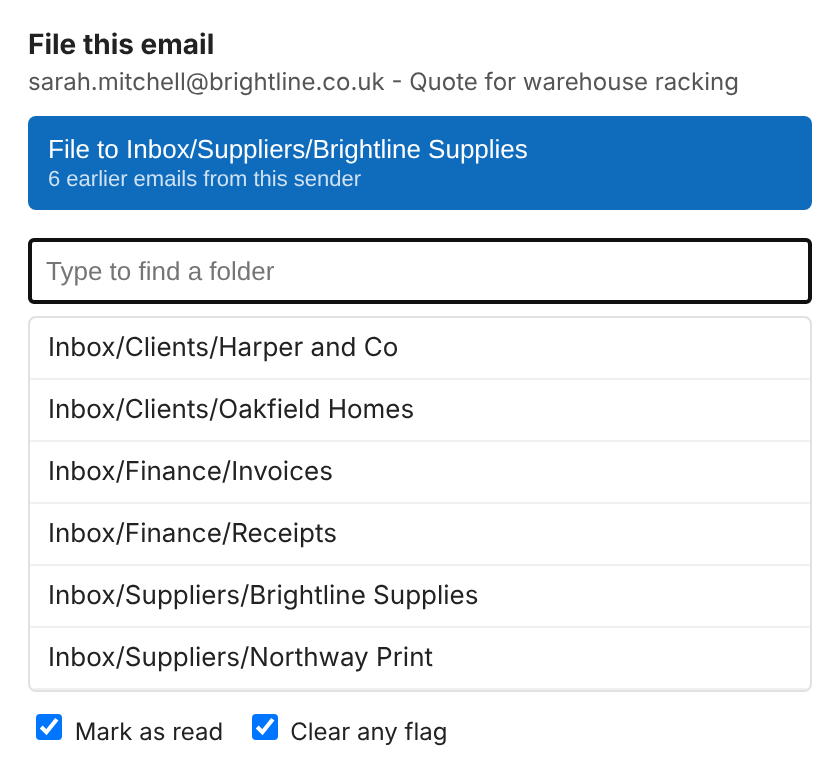
Under File to a folder, start typing a folder name and tap the result you want to file straight there. Your recent folders are listed underneath with a File button each. Browse all folders and filing options opens the full list and the extra options. You can also use File to… on the ribbon, which opens a window with the same list. Folders you used recently are at the top.
New folders you create in Outlook appear in the list within a minute. If one has not appeared, click Refresh folder list.
Same sender and this conversation
Further down the File It screen are two shortcuts:
- Same sender shows how many emails from this person are in your Inbox. You can file all of them to the suggested folder, or to the folder selected above.
- This conversation shows the emails in this thread, in every folder. Tick Include my replies in Sent Items to file your own replies with it.
Click Show the emails to see exactly what will move before you act.
The same actions are on the ribbon under More CogSnug > File conversation… and File all from sender….
Deleting
Each list also has a red Delete all button. It asks you to click again to confirm, and the emails go to Deleted Items, not away for good.
6. Filing many emails at once
Select several emails in your message list (Ctrl+click or Shift+click). The panel changes to say how many are selected and offers a folder for the whole group.
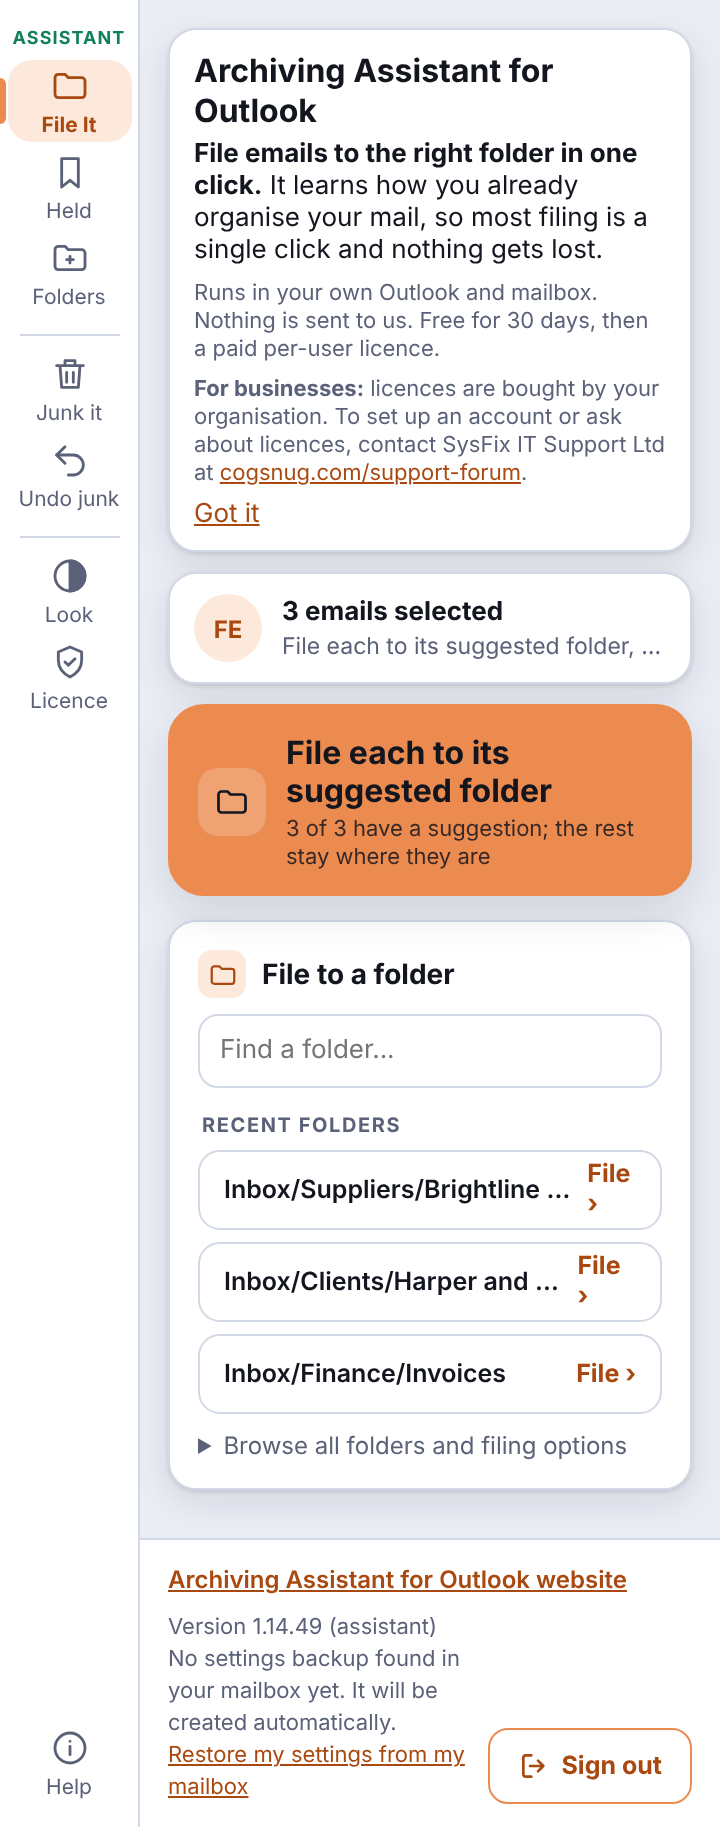
Look at the folder shown, check the number of emails, then click to file them all. Bulk actions ask you to confirm before they run.
7. Undo and recent filing
Filed something by mistake? Archiving Assistant keeps a list of what you filed recently, on the File It screen under Recent filing. Click Undo against an entry to put the email back where it came from. You can also use More CogSnug > Undo last filing on the ribbon.
- Undo works for 48 hours and on the device where you filed.
- Undoing also reverses what Archiving Assistant learned from that filing, so a mistake does not teach it the wrong habit.
8. Follow up: To Do, calendar and snooze
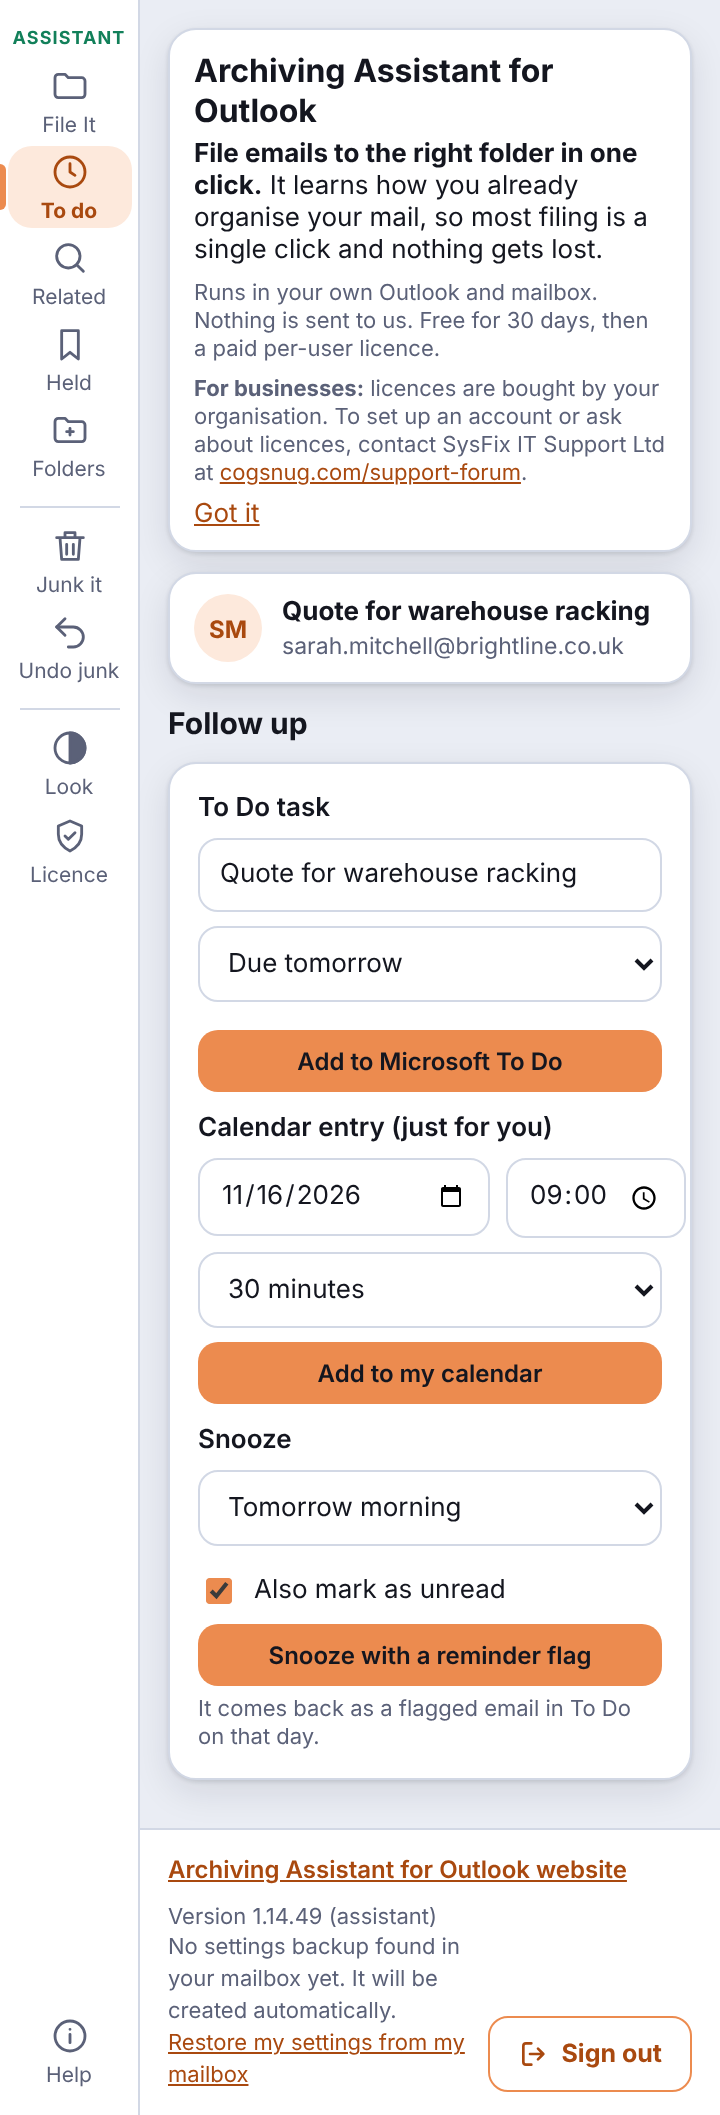
Click To do on the rail (or More CogSnug on the ribbon) to turn an email into something you will act on later.
Add to Microsoft To Do
Creates a task with a link back to the email. Choose when it is due: today, tomorrow, in 3 days, next Monday, in 2, 4 or 8 weeks, or pick a date. Then click Add to Microsoft To Do. In construction mode your contract deadlines (such as “Chase RFI answer, 7 days”) are also on offer here. The chosen deadline sets the due date and starts the task title.
Add to your calendar
Creates a calendar entry just for you, lasting 15 minutes, 30 minutes, 1 hour or 2 hours, so you can block time to deal with it.
Snooze
Takes the email out of the way until you want it. Choose tomorrow morning, next Monday, in a week or a date. The email comes back as a flagged item in To Do on that day, and you can also mark it as unread so it stands out when it returns.
From the ribbon
More CogSnug > Snooze…, Add to To Do… and Add to calendar… open small windows with the same choices.
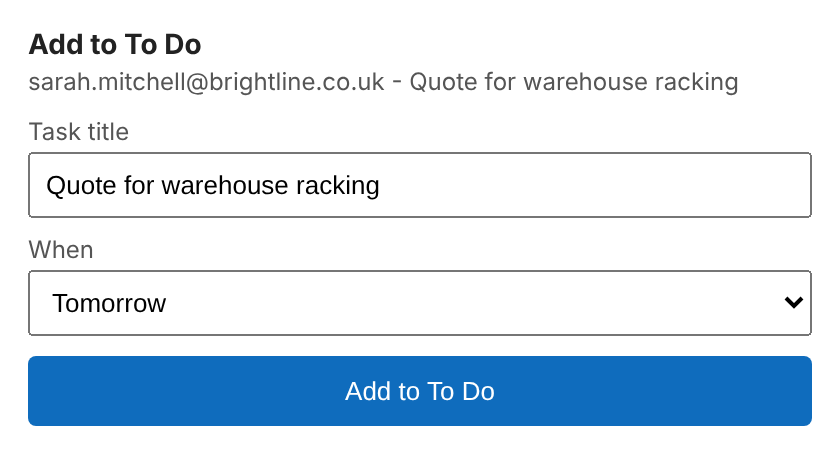
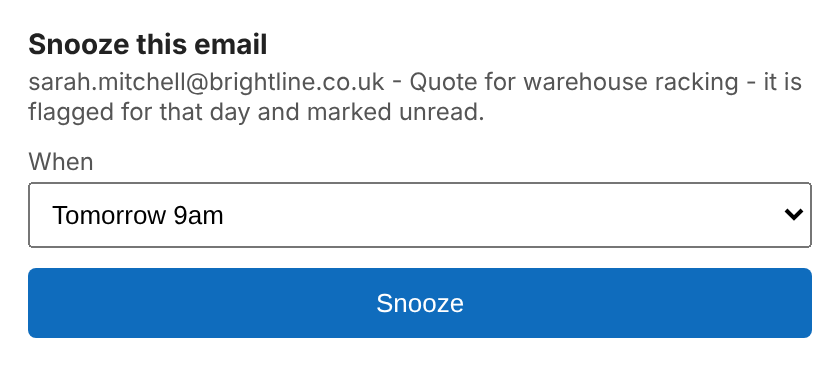
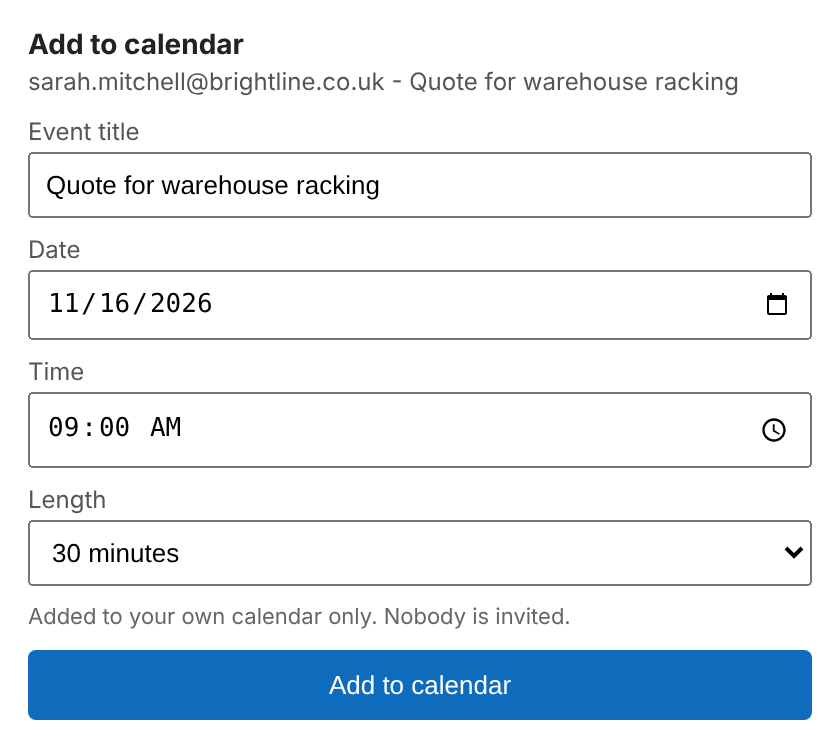
The first time you use To Do or Calendar, Microsoft asks you to allow it. Accept and try again.
9. Find related emails
Click Related on the rail. Search every folder for emails in this conversation or from this sender, tick the ones you want, then file them or delete them together. It is useful for gathering everything on one subject that has ended up in different places.
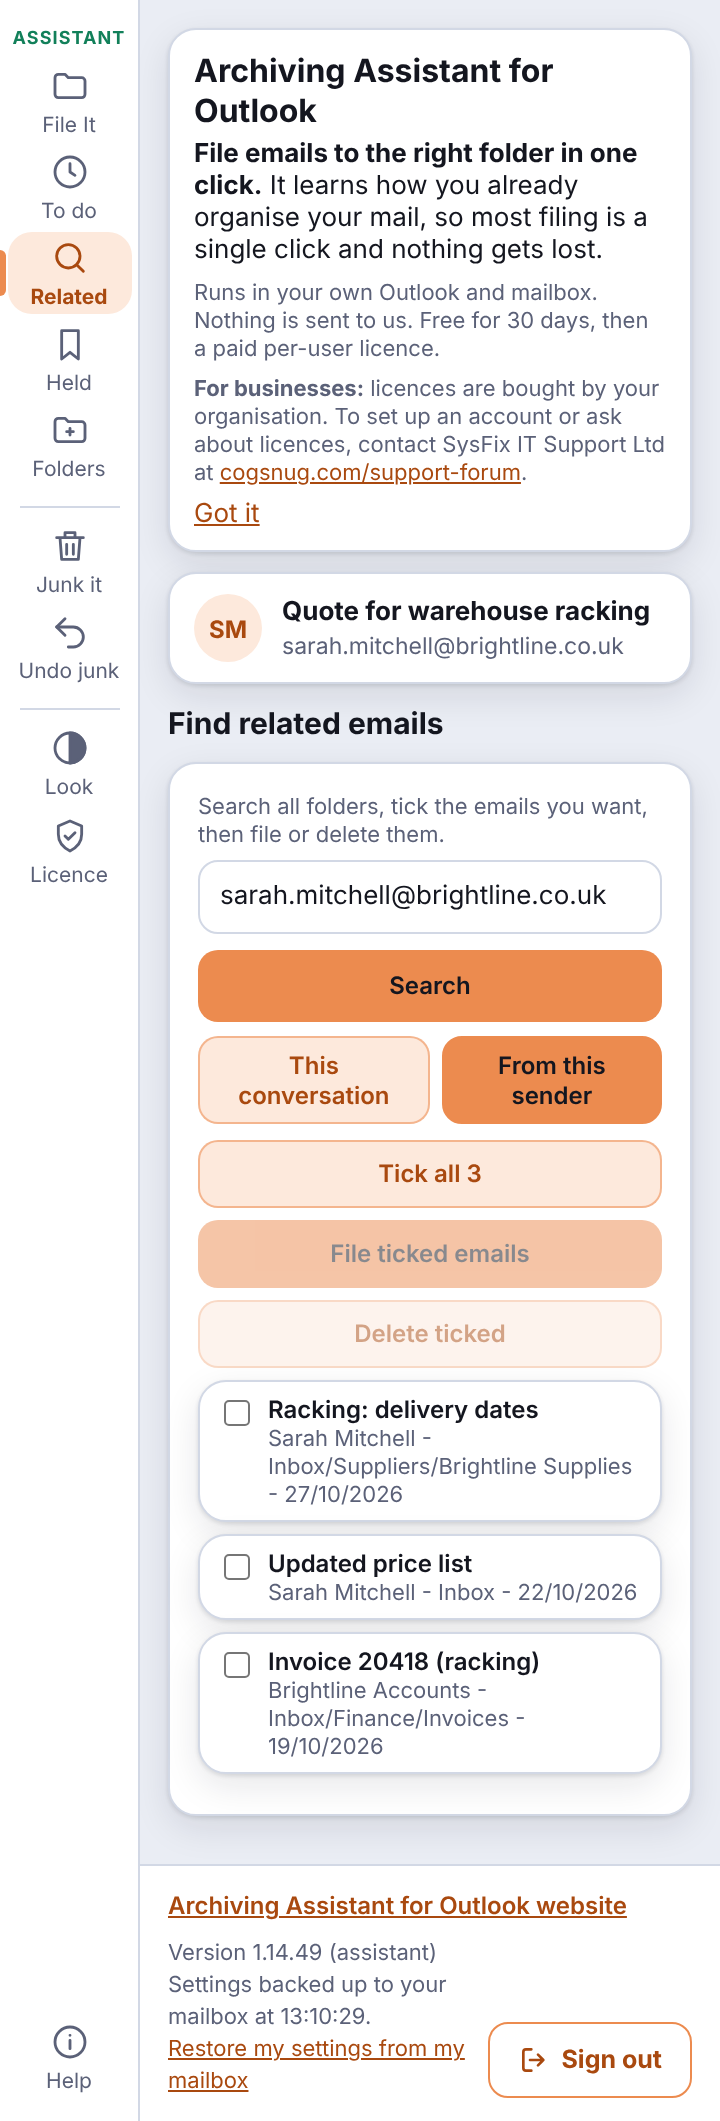
In construction mode, click a reference chip under the email (for example Job P1040 or RFI 023) to find everything with that reference.
10. Folders tool
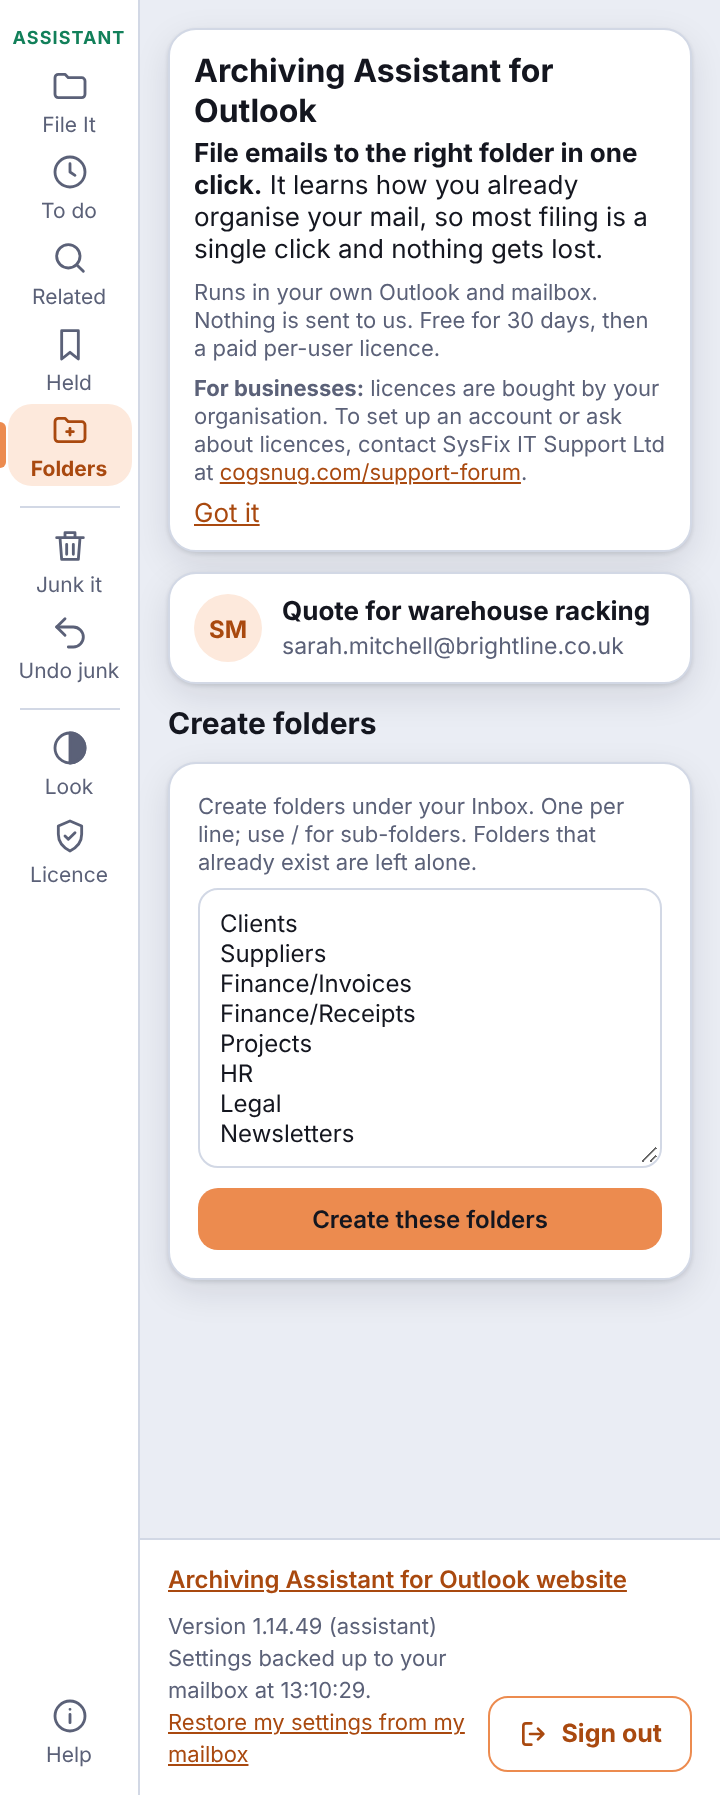
Click Folders on the rail to create folders in bulk. Under Other folders type one folder per line (use / for a sub-folder, such as Finance/Invoices) and click Create these folders. Folders that already exist are left alone. Construction users also find the job tools here (see Construction features in detail).
11. Held mail
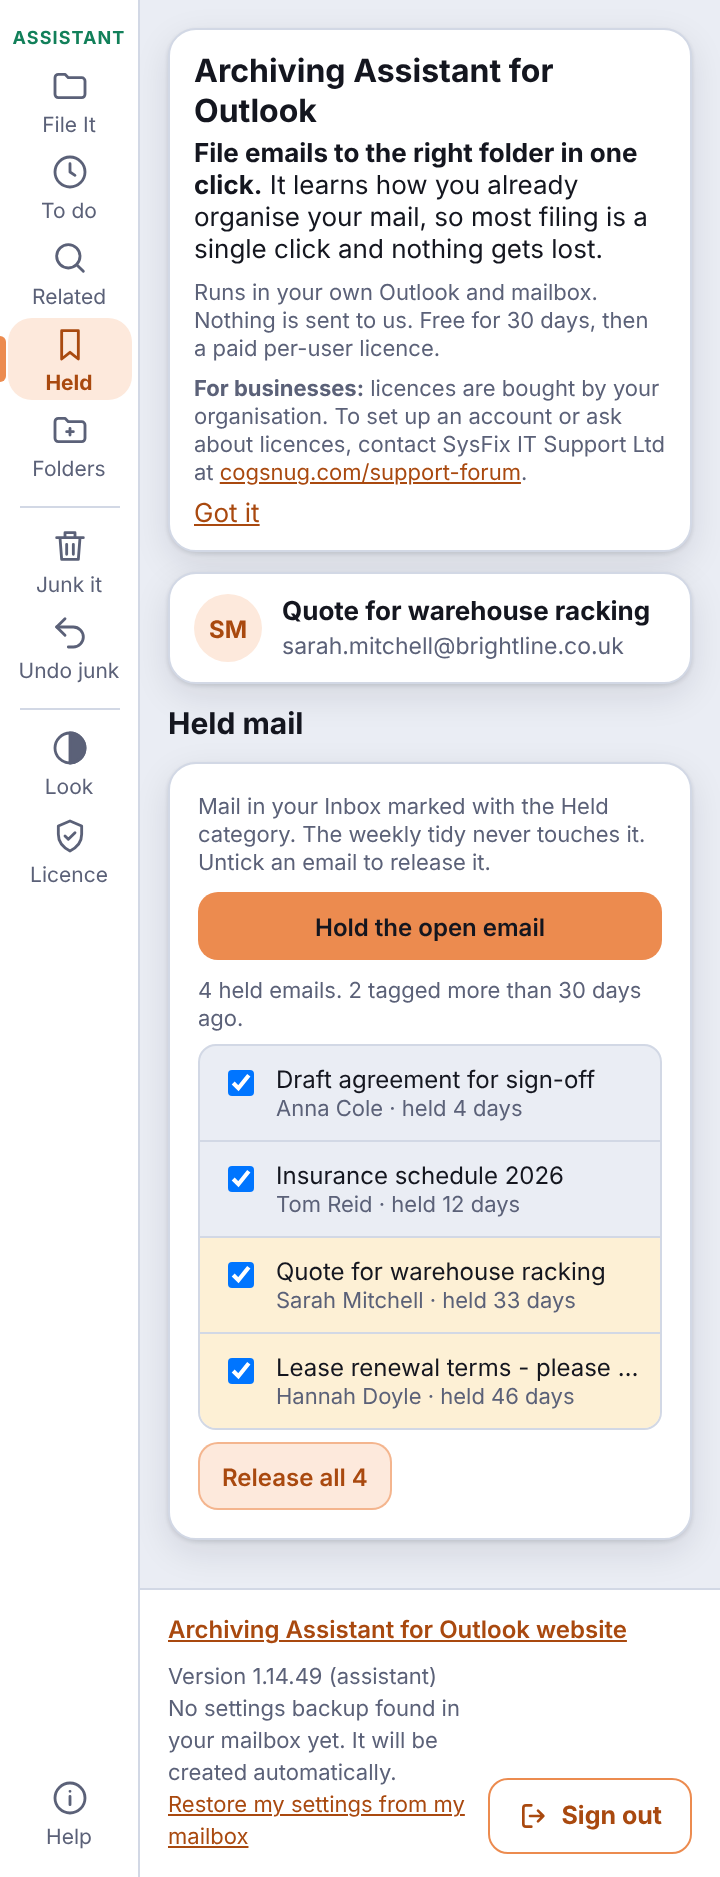
Some emails you are not ready to deal with, but you do not want them tidied away or lost in a long Inbox. Mark them as Held. A held email stays in your Inbox with a Held tag (an ordinary Outlook category), and Archiving Assistant never moves it. Held works on every plan. If you have Automation, the weekly tidy and the mailbox report also leave held mail alone.
Hold an email
- Open or select the email.
- Click Held on the rail, then Hold the open email.
- The email now carries the Held tag and appears in the list.
The first time, Archiving Assistant creates the Held category in your own mailbox if it is not there yet. In someone else’s shared mailbox you may not be allowed to create a category, so ask the mailbox owner to add a category called Held first.
See what you are holding
The Held screen lists every email in your Inbox that carries the Held tag, with the date, the sender and how long ago it was tagged. Emails held for 30 days or more are shown in orange, so nothing sits forgotten. Click Refresh the list to read it again.
Release an email
- Untick an email to release it. Only the Held tag is removed. Any other categories on the email stay, and the email does not move. Tick it again to hold it again.
- Release all removes the Held tag from every email in the list. It asks you to click a second time to confirm. Nothing is moved or deleted.
Good to know
- You can also add or remove the Held category by hand in Outlook. The Held screen shows it either way.
- Only mail that is still in the Inbox counts as held. If you move a held email to another folder, it drops off the list.
- If you have Automation, your mailbox report adds a reminder line for mail held for more than 30 days.
12. Junk it and Undo junk
Junk it is for email you never want to see again. It moves the email to Deleted Items (never deleted for good) and remembers that you junked it. Click Junk it on the rail or the ribbon. If you change your mind, click Undo junk.
- It all happens in your own Outlook. Nothing is sent to Archiving Assistant, and it works in shared mailboxes too (the email goes to the Deleted Items of the mailbox you are looking at).
- Undo junk uses the same Recent filing list as filing, so it covers the last 48 hours on this device. Several emails junked together are undone together.
- If something goes wrong, the real reason is shown (for example, you do not have access to that shared mailbox).
What Archiving Assistant remembers about junk
Each time you junk an email Archiving Assistant adds a small tally to a hidden note in your own mailbox: the sender and the kind of subject. It is never sent anywhere. If you have Automation, the weekly tidy can use these tallies to suggest a rule, which waits for your approval on the Review page. On other plans the tally simply waits in case you upgrade. To stop it, untick Remember what I junk in Help; from then on nothing is written. Junk memory is not kept in shared mailboxes.
13. Construction features in detail
These appear when Construction mode is on (Look > Industry). Turning it on also shows the Jobs tab; turning it off hides the tab but keeps your settings.
Job picker and file to a job
On File It, File to a job lists your live jobs: every folder under your jobs folder whose name holds a job number (finished jobs in Archive are left out). The job in the email's subject comes first, then your recent jobs. Choose the job and the Outlook sub-folder inside it, then click File to this job. If the email has no job number in it, you can still file it in two clicks.
Sub-folder guess
Archiving Assistant reads the wording of the subject to pick the sub-folder: an RFI, an instruction or variation (SI, AI, CE, VO, EW), a valuation or payment, a defect or snag, RAMS, a drawing, the programme, a meeting, a tender, the contract or site records. It matches against the names of the sub-folders you already have, so it works with your own names. If the job has no matching sub-folder, it suggests the job folder itself.
Reference chips
Under the email you see small chips such as Job P1040, RFI 023, CE 012 or Valuation 5. Click one to find every email with that reference.
New job (folders)
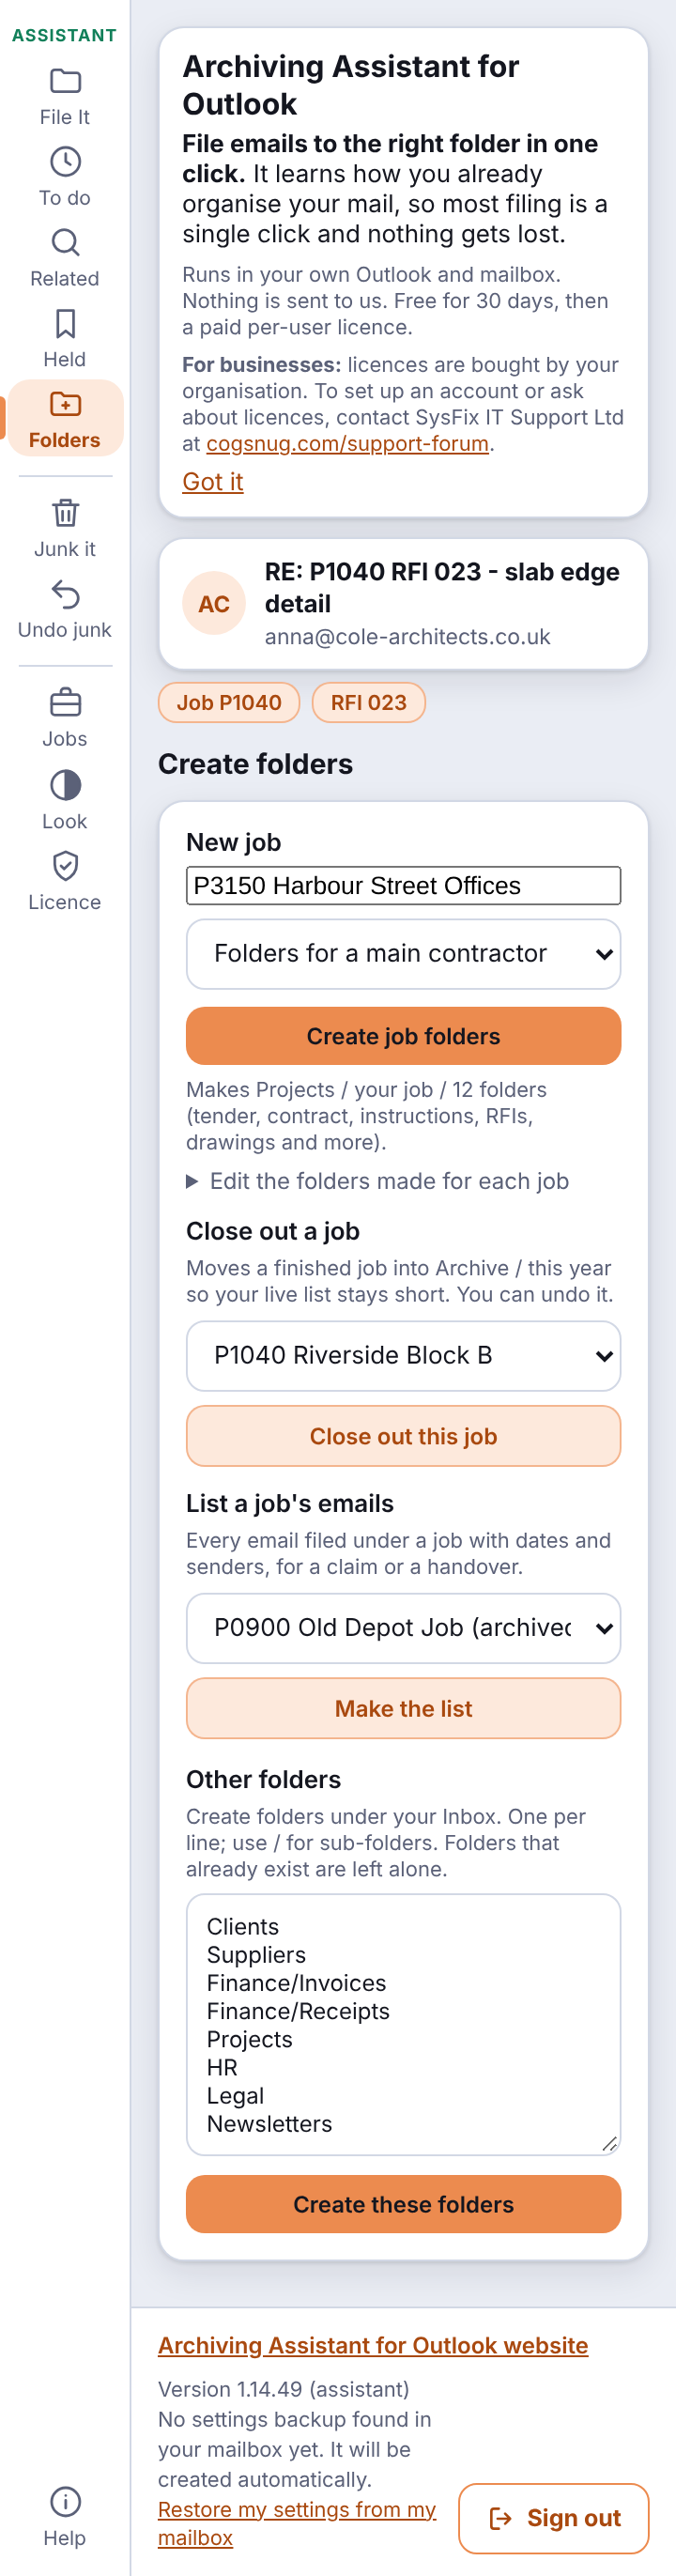
Open Folders. Under New job type the job number and name (for example P3150 Harbour Street Offices), choose a folder set and click Create job folders. The presets are:
- main contractor
- subcontractor
- consultant or project manager
- M&E or specialist
- blank
Click Edit the folders made for each job to change the list (one folder per line; use / for a sub-folder, for example 04 RFIs/Open). The job number must be in the name, and Archiving Assistant will not make a second folder for a job number that already exists.
Close out a job
Choose a finished job and click Close out this job. It moves to Archive/<year> so your live list stays short, and Archiving Assistant stops suggesting it. You confirm first, and you can undo it for 7 days.
List a job's emails
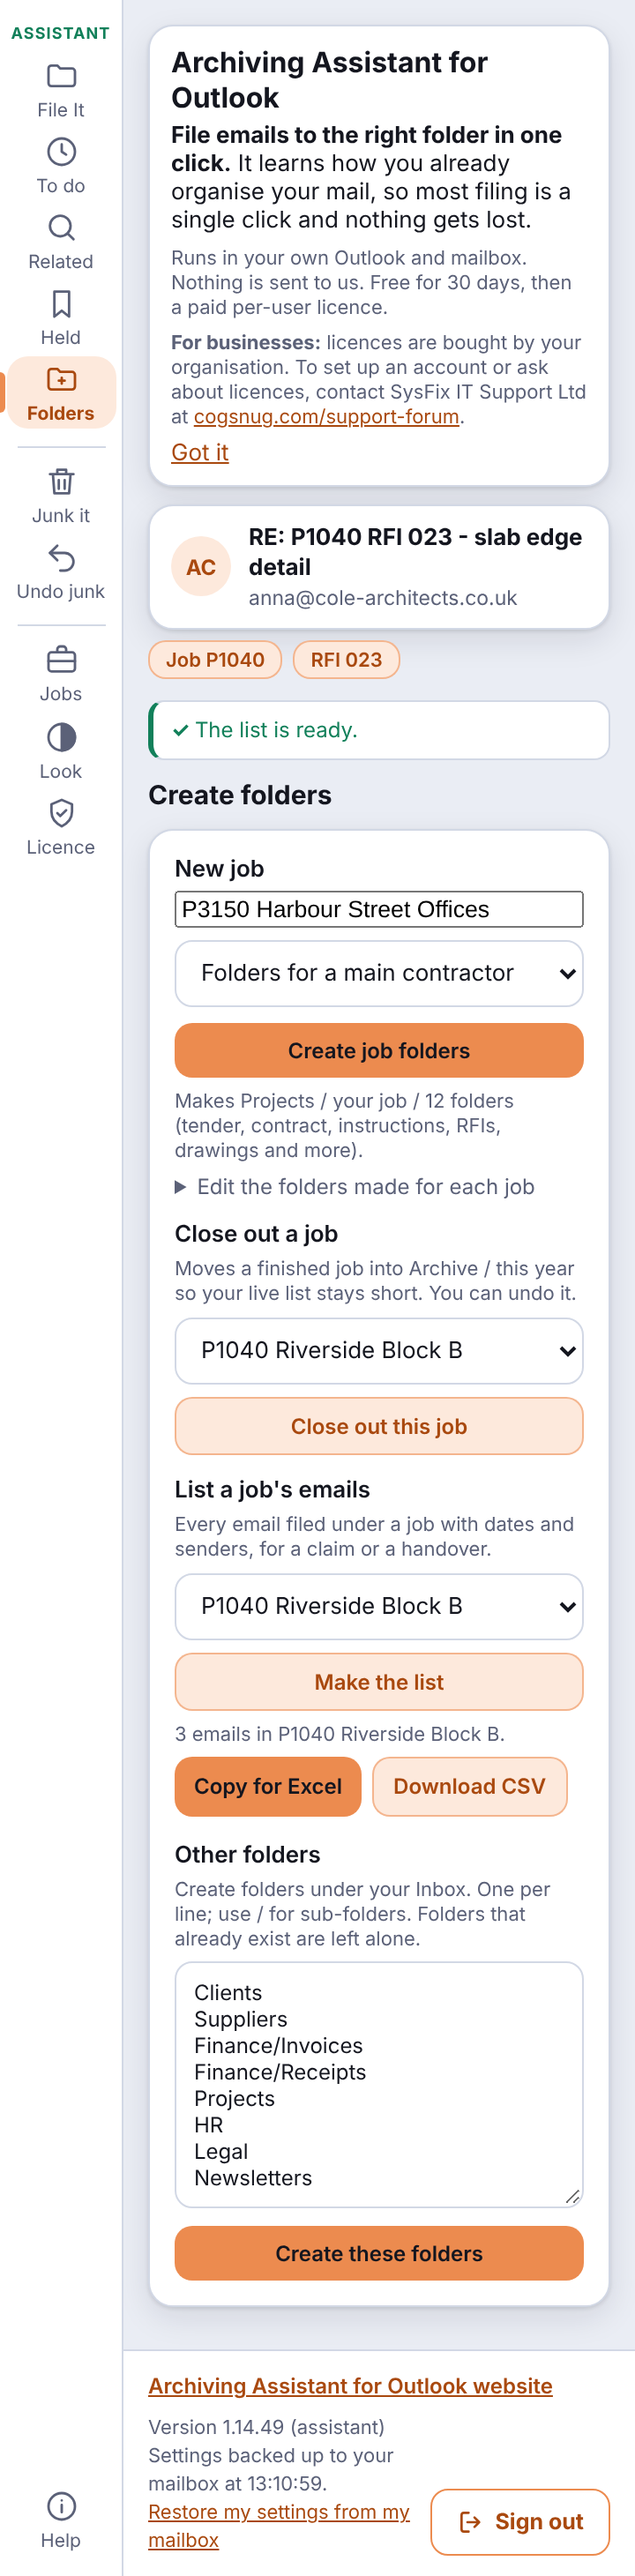
Choose a job and click Make the list. You get every email filed under the job, in all its sub-folders, with the date, sender, recipients, subject, folder, attachments and a link. Click Copy for Excel or Download CSV. It is handy for a claim or a handover. Up to 3,000 emails are listed.
Contract deadlines
See Follow up. Edit the deadlines on the Jobs tab.
Saving a copy to the file server
If your firm keeps job emails on a file server, Archiving Assistant can save a copy of an email there as an .eml file (which opens in Outlook, with its attachments).

- Also save a copy to the file server: tick it, then click File to this job. The copy is saved first, and the email is filed in Outlook only if the save worked.
- Server sub-folder inside the job: type one, such as
Tenders\Stage 1, or leave it blank to choose it in the save window, which lets you browse the job's real folders. - Under File server tools: Save to the file server only, Copy the server folder path (to paste into any Save As box), Download as .eml, and Choose the server folder again.
The first time, a small save window asks you to pick the folder that holds your jobs (for example P:\Projects), and your browser may ask you to Allow access. Archiving Assistant finds the job folder inside it by the job number, so P1040 matches P1040 Riverside Block B. It only creates folders below the job folder, never creates the job folder itself, never overwrites an existing file, and stops if two folders start with the same job number. Files are named with the date, time, sender and subject.
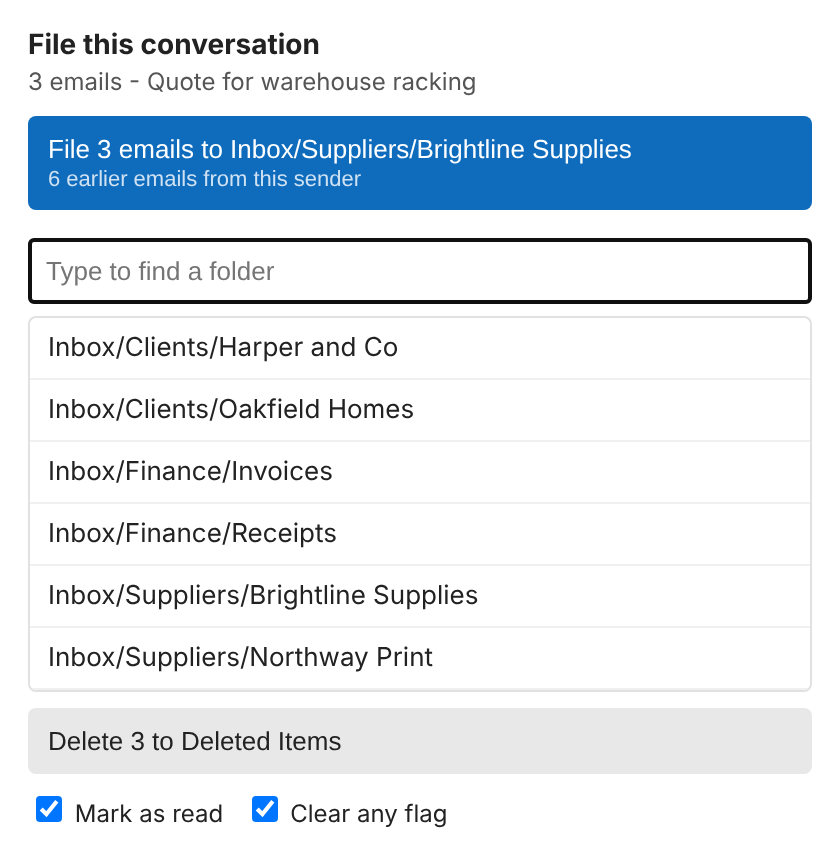
If Outlook will not let the panel open the folder chooser, Archiving Assistant tells you, and you can still use Copy the server folder path or Download as .eml.
14. Appearance and layout
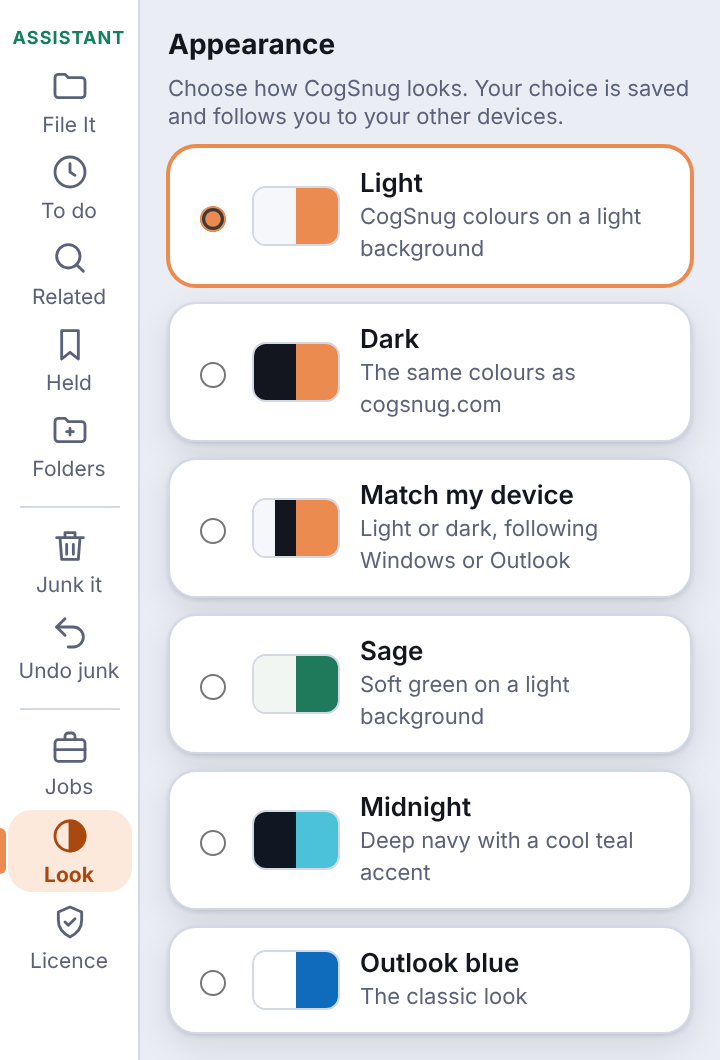
Click Look. Your choice is saved and follows you to your other devices.
Colour schemes
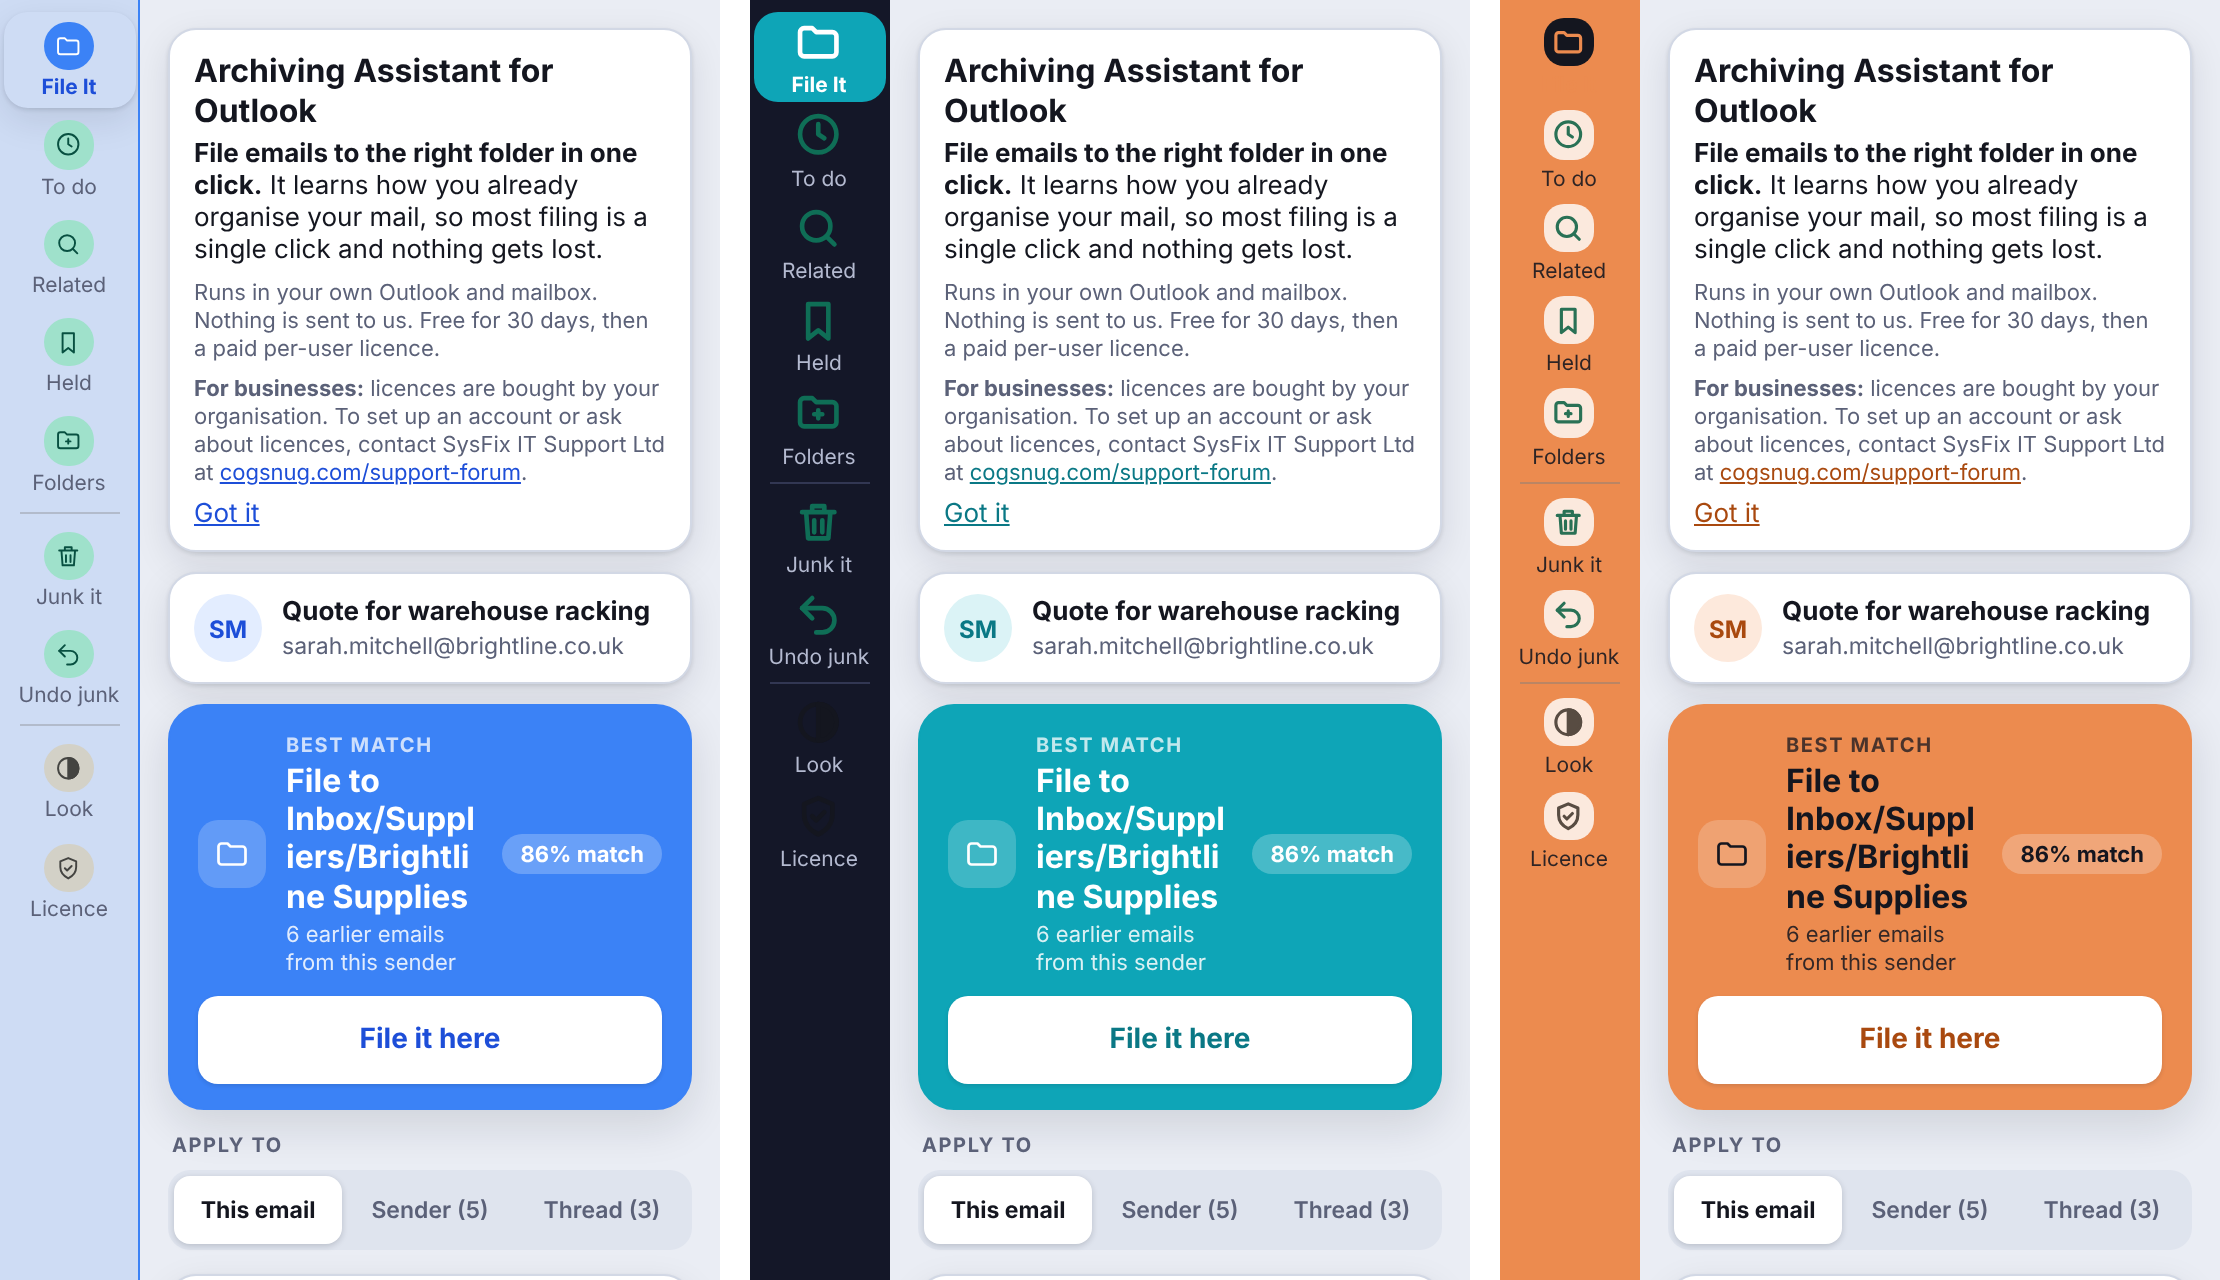
Choose Light, Dark, Match my device, Sage (soft green), Midnight (deep navy) or Outlook blue.
Accent colour
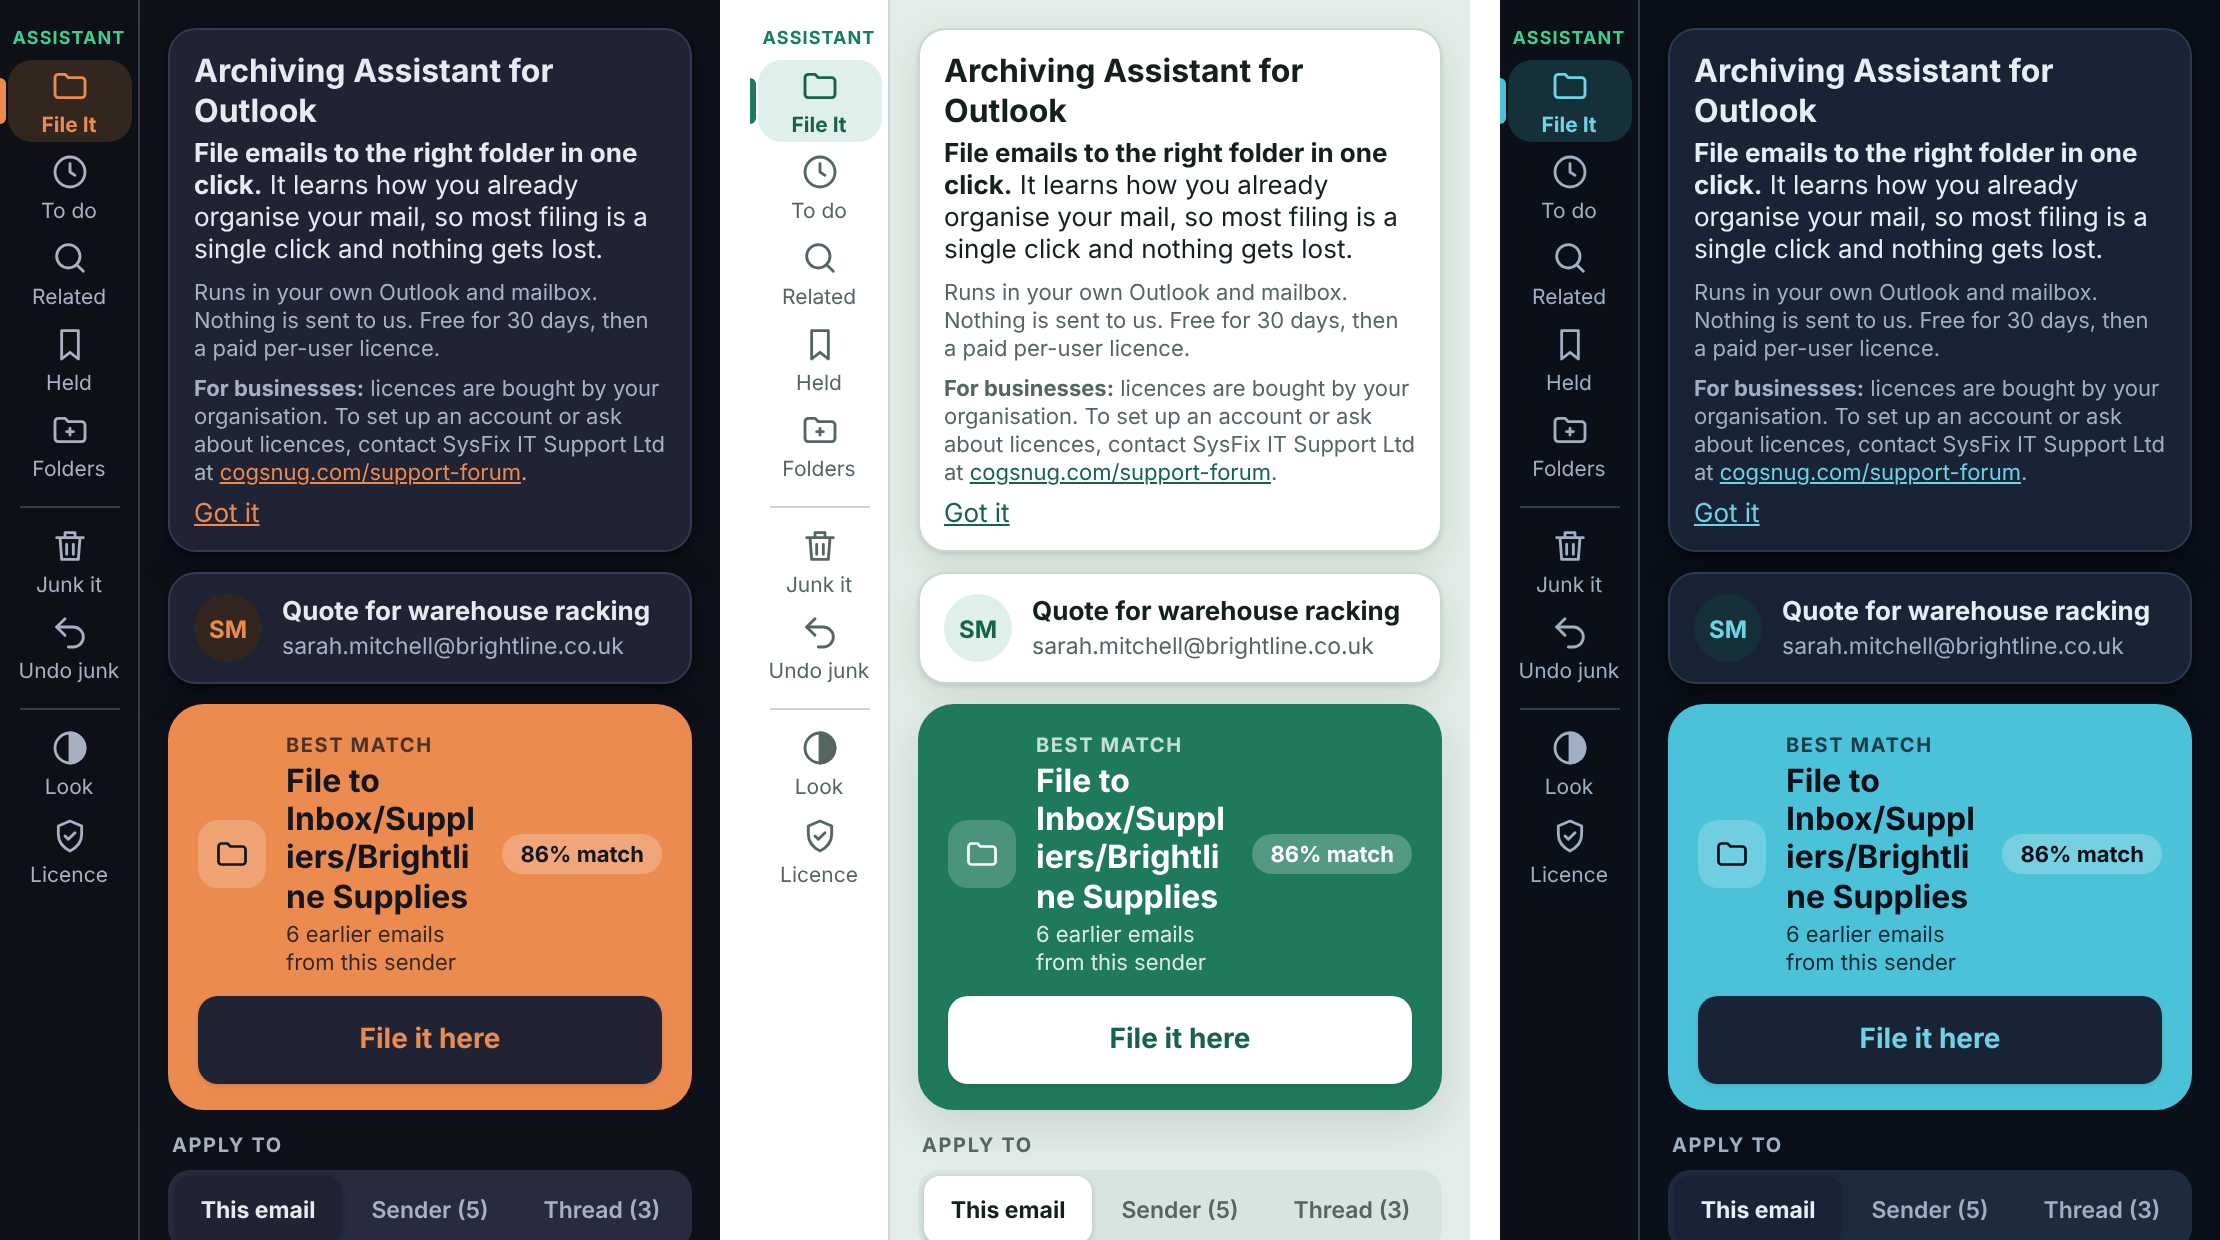
The accent is the colour of buttons and highlights. The first swatch, Theme colour, uses the colour scheme’s own accent. Pick Orange, Blue, Green, Purple, Pink or Teal to use that colour in every colour scheme instead.
Layout
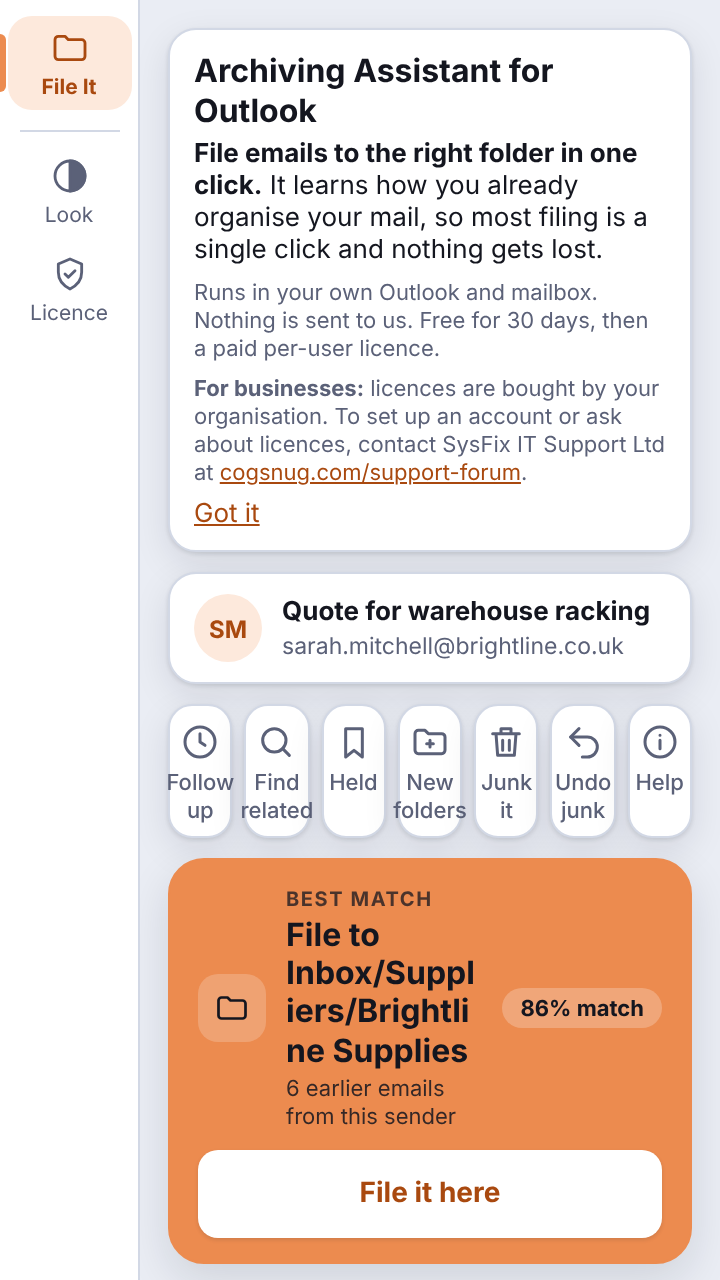
Choose Side rail (tools in an icon bar on the left) or Icon row (tools in a row under the email). The icon row suits a narrow panel.
Side rail colour
Make the icon bar stand out more. Match blends in with the panel, Tinted adds a soft wash of the accent colour, Dark makes the rail dark and Bold fills it with the accent colour. It works with every colour scheme and accent. This applies to the Side rail layout only.
Side rail icons
Standard is the slim outline set. Tiles puts each tool on a small coloured tile, and Bold uses thicker, coloured icons, so each tool is easier to spot. The icons shrink to fit, so every tool should stay in view without scrolling. On a very narrow panel the labels are hidden.
Density
Comfortable leaves more space around everything. Compact uses tighter spacing so more fits on screen, which helps if you have many folders.
15. Licence and trial
Click Licence to see your plan, when it expires, how many licences your organisation has, who it is licensed to and who you are signed in as. The licence is checked quietly with your Microsoft sign-in, and nothing from your mailbox is sent.
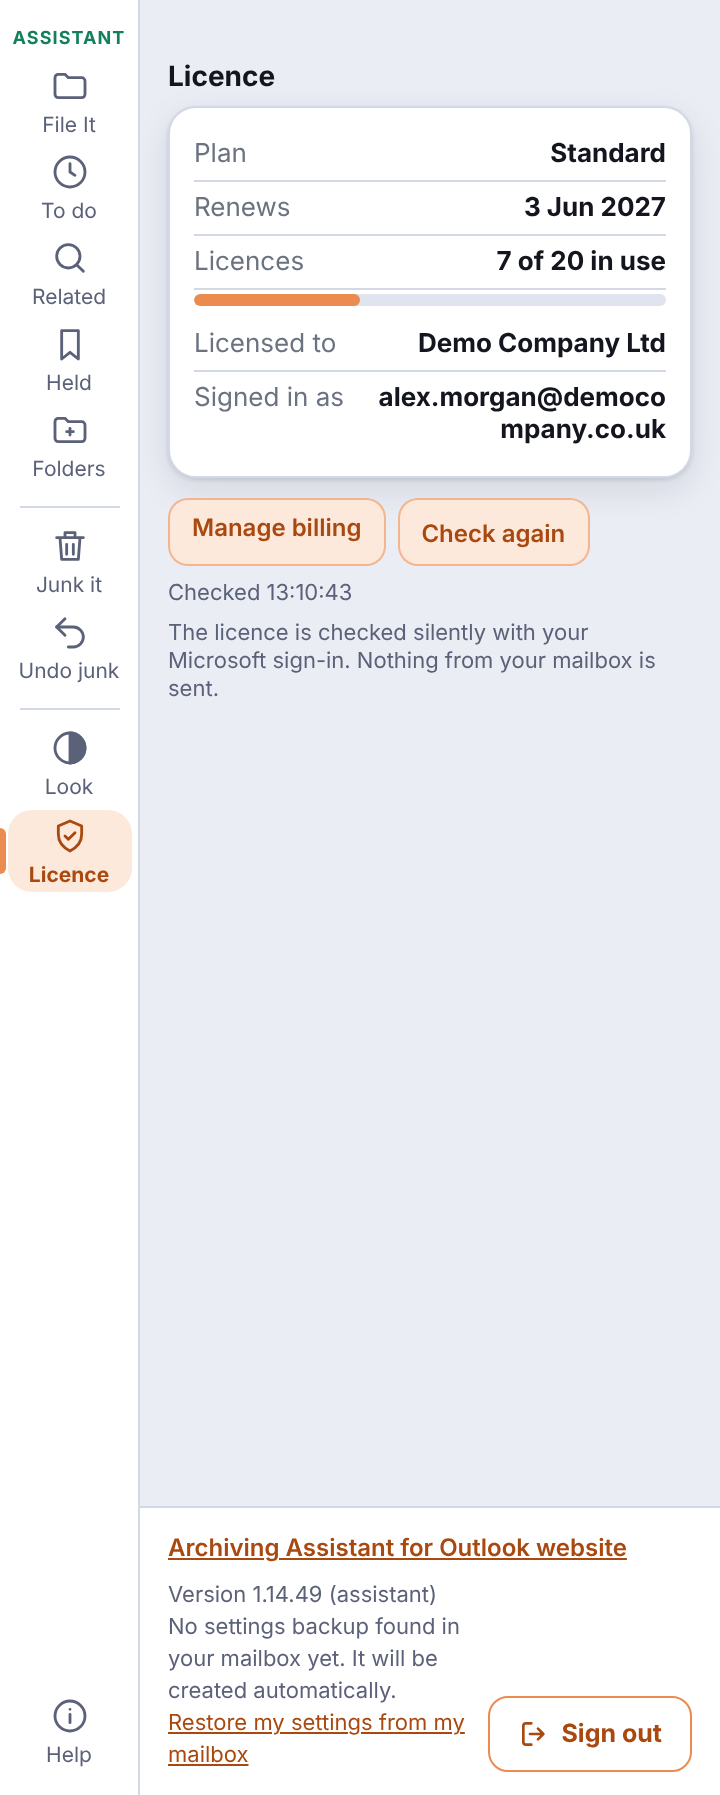
- Check again re-reads your licence.
- Upgrade and Manage billing open our website.
- Manage licences (administrators): lists everyone holding a licence and when they were last seen. Release licence (press twice to confirm) frees that seat, for example after a mailbox has been deleted. Seats not used for 60 days are also freed automatically. A released person takes a seat again if they open the add-in later and one is free.
During the trial
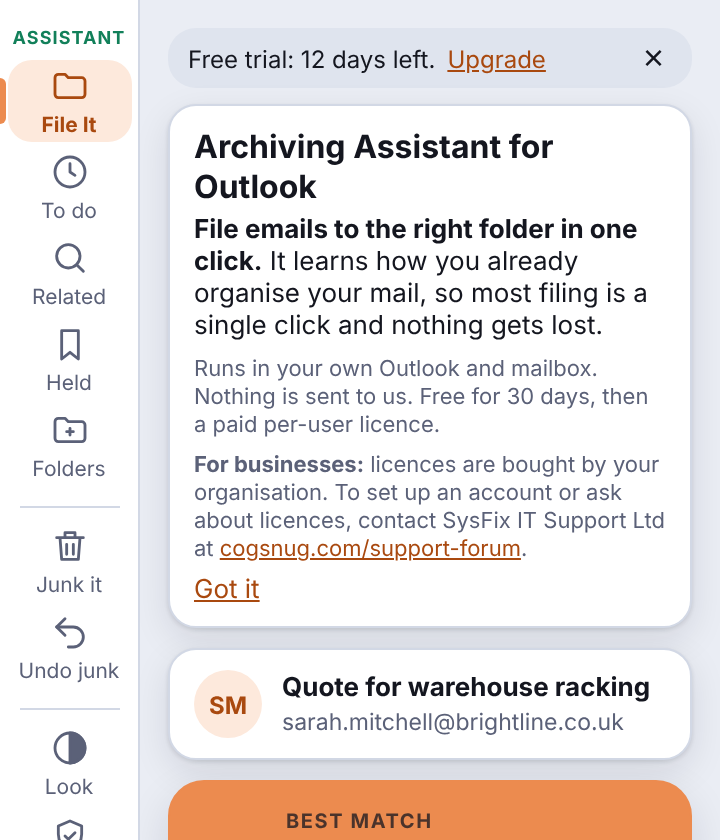
New organisations get a 30-day trial with everything switched on. A banner shows the days left.
When a trial ends
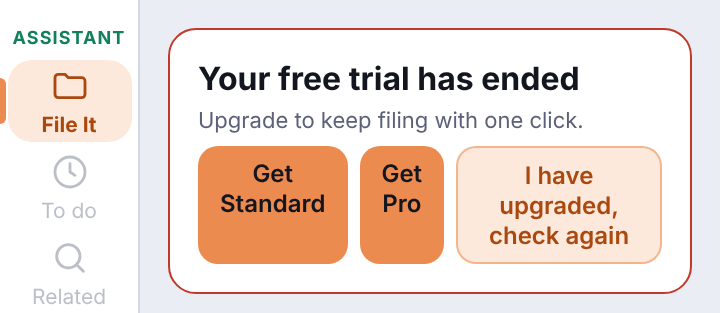
The panel says Your free trial has ended with an Upgrade button. After upgrading, click I have upgraded, check again. Nothing in your mailbox changes in the meantime. Your folders and email stay as they were.
16. Automation PRO
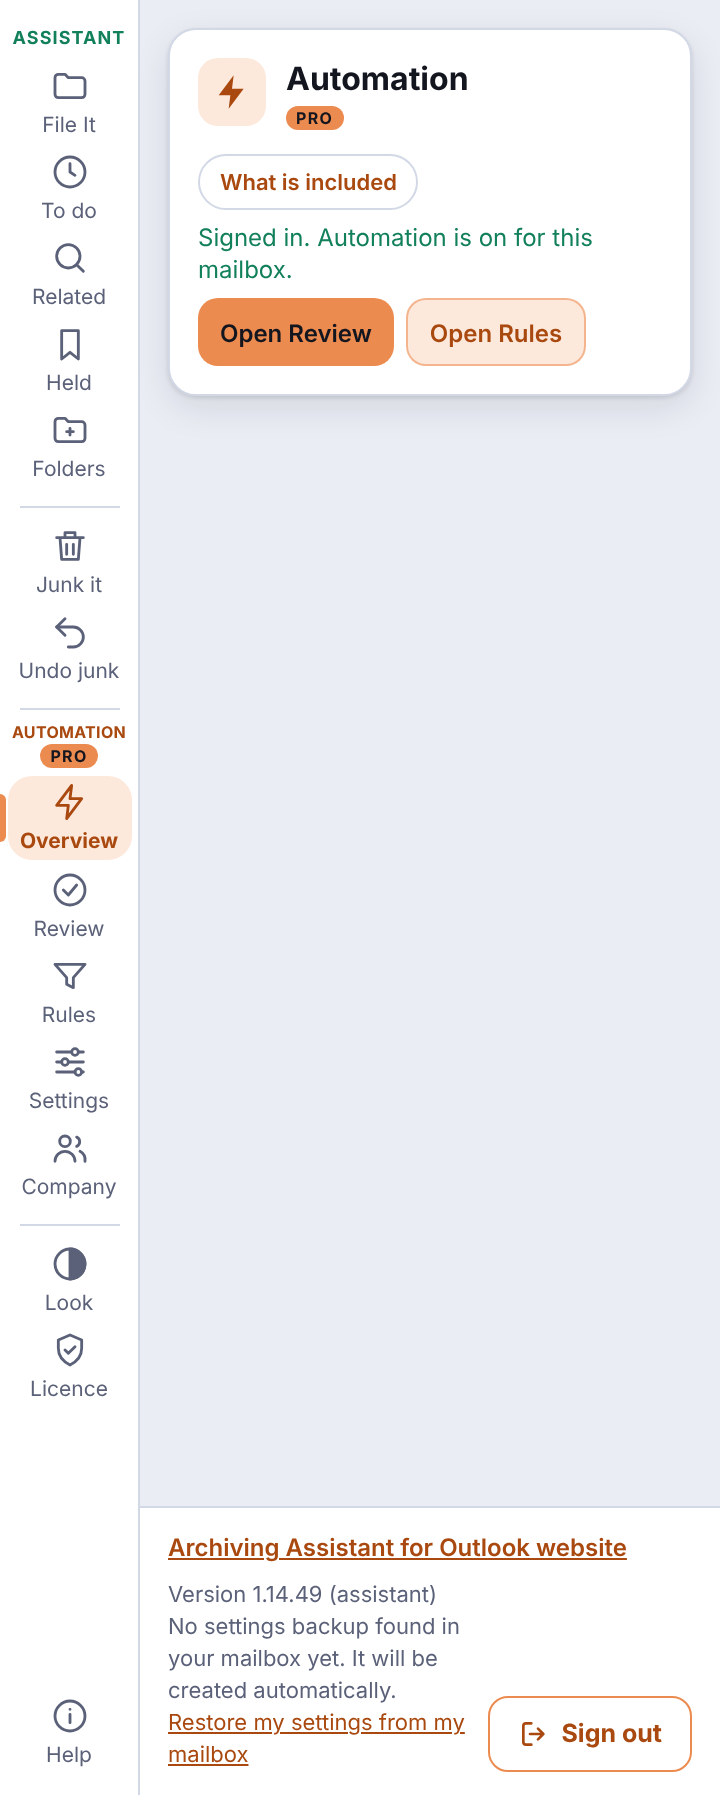
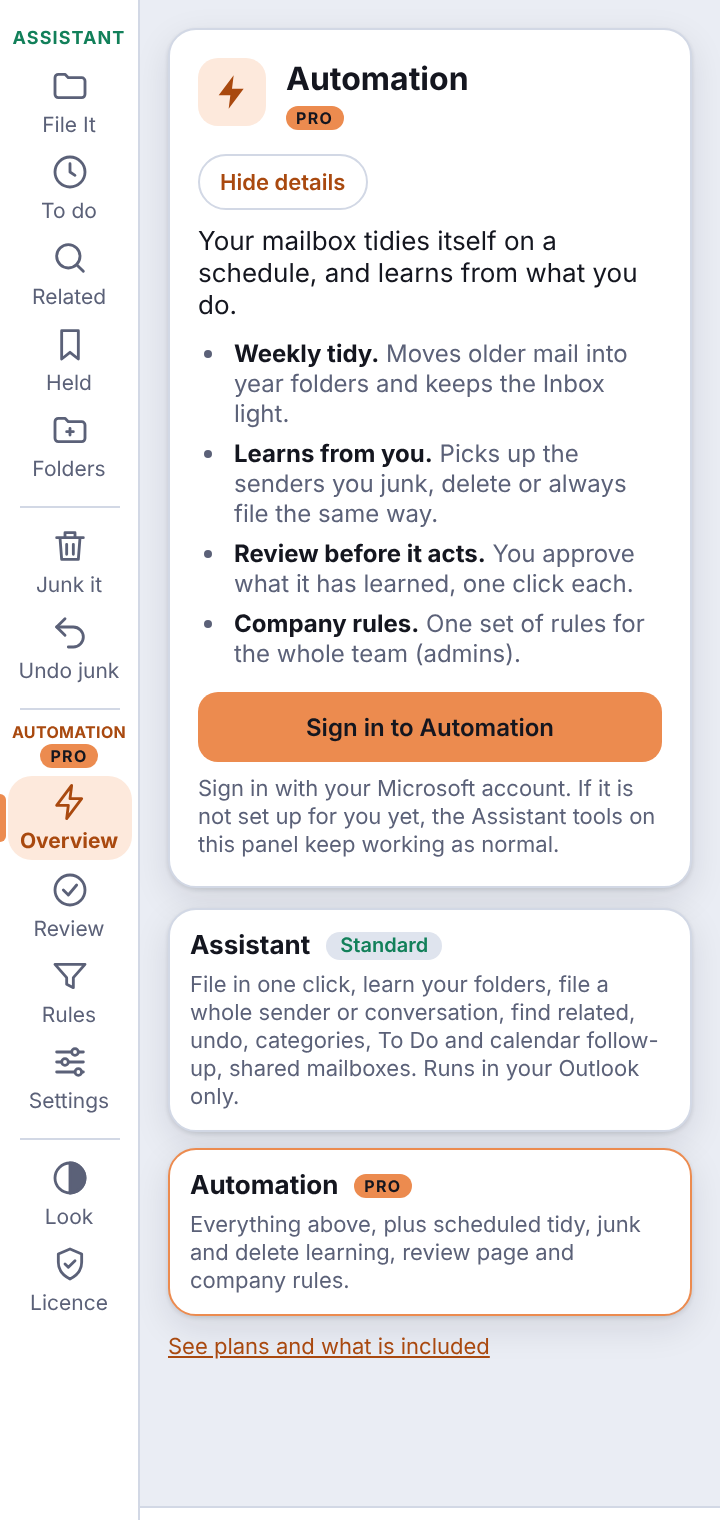
Automation lets your mailbox tidy itself and learn from what you do. It needs the Pro licence, and it is set up for your organisation. If it is not set up for you yet, the Assistant tools carry on working as normal.
What it does
- Weekly tidy. Once a week, older mail is moved into year folders so your Inbox stays light. It follows the choices you make in Settings.
- Suggests, never surprises. It notices the senders you delete or junk and the folders you always file a sender into. Everything it learns is only a suggestion: nothing happens until you approve it.
- Mailbox report. A short message in your own Inbox that shows what needs your attention and what could be tidied (see below).
- Company rules. One set of rules for the whole team (administrators).
Money, renewal and action mail is protected: invoices, payments, due dates, orders and things you need to act on are never tidied away. Held and flagged mail is never touched. Nothing is ever deleted for good: anything removed goes to Deleted Items.
What Automation reads and keeps
The Assistant tools run entirely inside your Outlook. Automation is different: it is a service run for your organisation by SysFix IT Support. To tidy your mailbox and write your report it reads your mailbox with a permission your organisation granted, looking at who an email is from, its subject and the start of the message. It keeps your Automation settings, your rules and the sender addresses those rules are about. The report is placed in your own mailbox and is never emailed out. Ask your IT provider if you need the full privacy details for your organisation.
Signing in
Open Overview and click Sign in to Automation with your Microsoft account. The overview confirms “Automation is on for this mailbox”.
Settings and the guided setup
The first time you open Settings, a quick guided setup starts by itself and walks you through the choices, one screen at a time, and explains each one. Click Start to begin or Skip setup to go straight to the settings. You can run it again at any time with Run setup again.
| 1 Welcome | Explains the setup. Nothing is deleted without your say-so. |
|---|---|
| 2 Preview first | Tick Preview only so the tidy-up reports but moves nothing. Untick it when the reports look right. |
| 3 Your Inbox | How many days of mail to keep in the Inbox, an extra safety margin for recent mail, and whether older mail goes into year folders. |
| 4 Always leave alone | Flagged, high-importance and unread mail, and mail with categories you list, are never moved. |
| 5 Money, renewals and action | Word lists that spot invoices, renewals and things to do, with a box to test an email title. |
| 6 Learning from you | Whether Archiving Assistant may suggest rules from the folders you file to and the mail you delete or junk. It only suggests. |
| 7 Your mailbox report | Switch the report on or off and choose daily or once a week. |
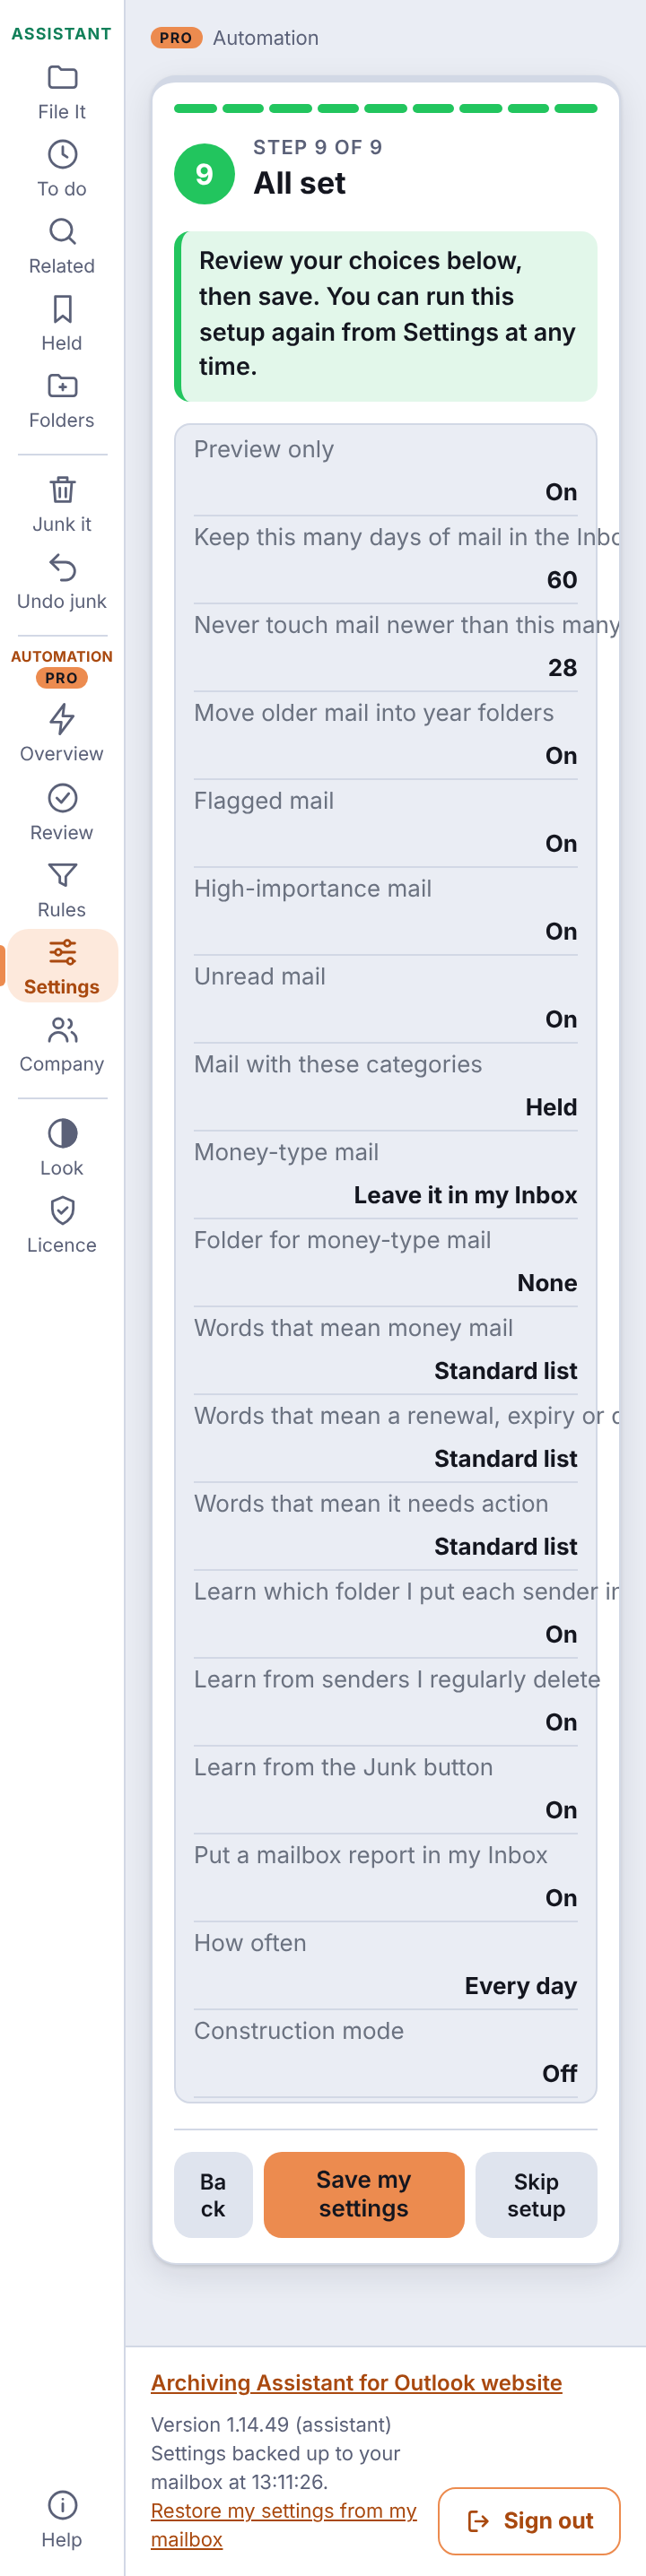
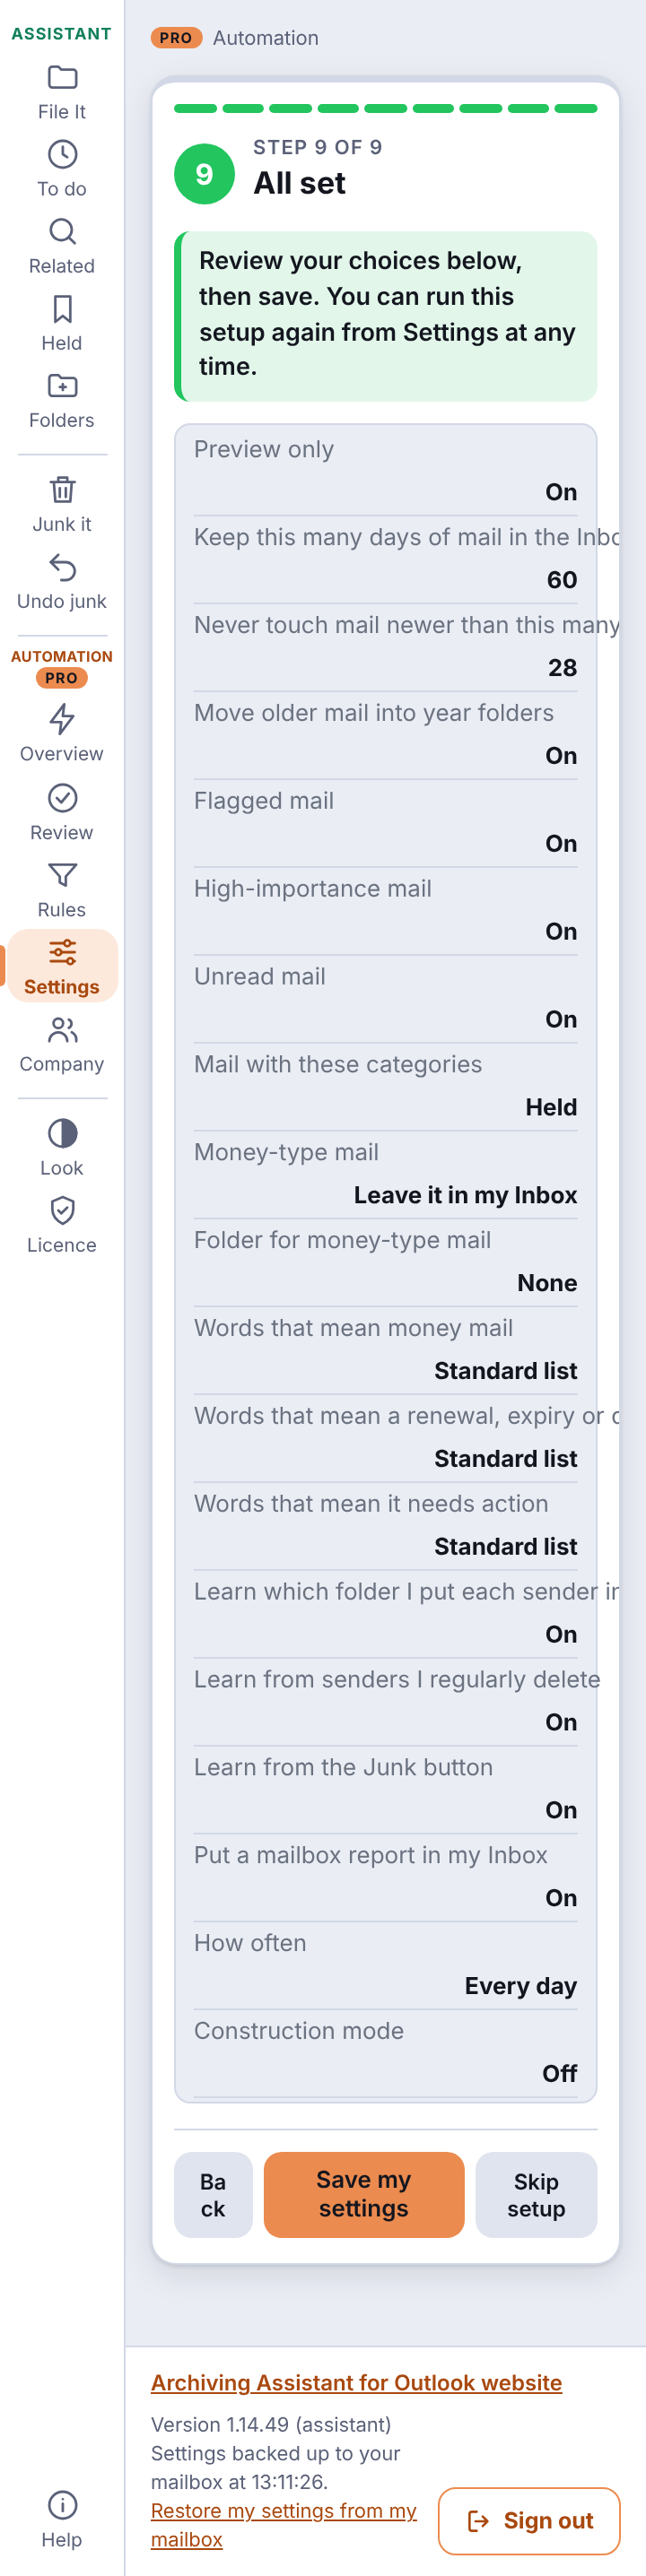
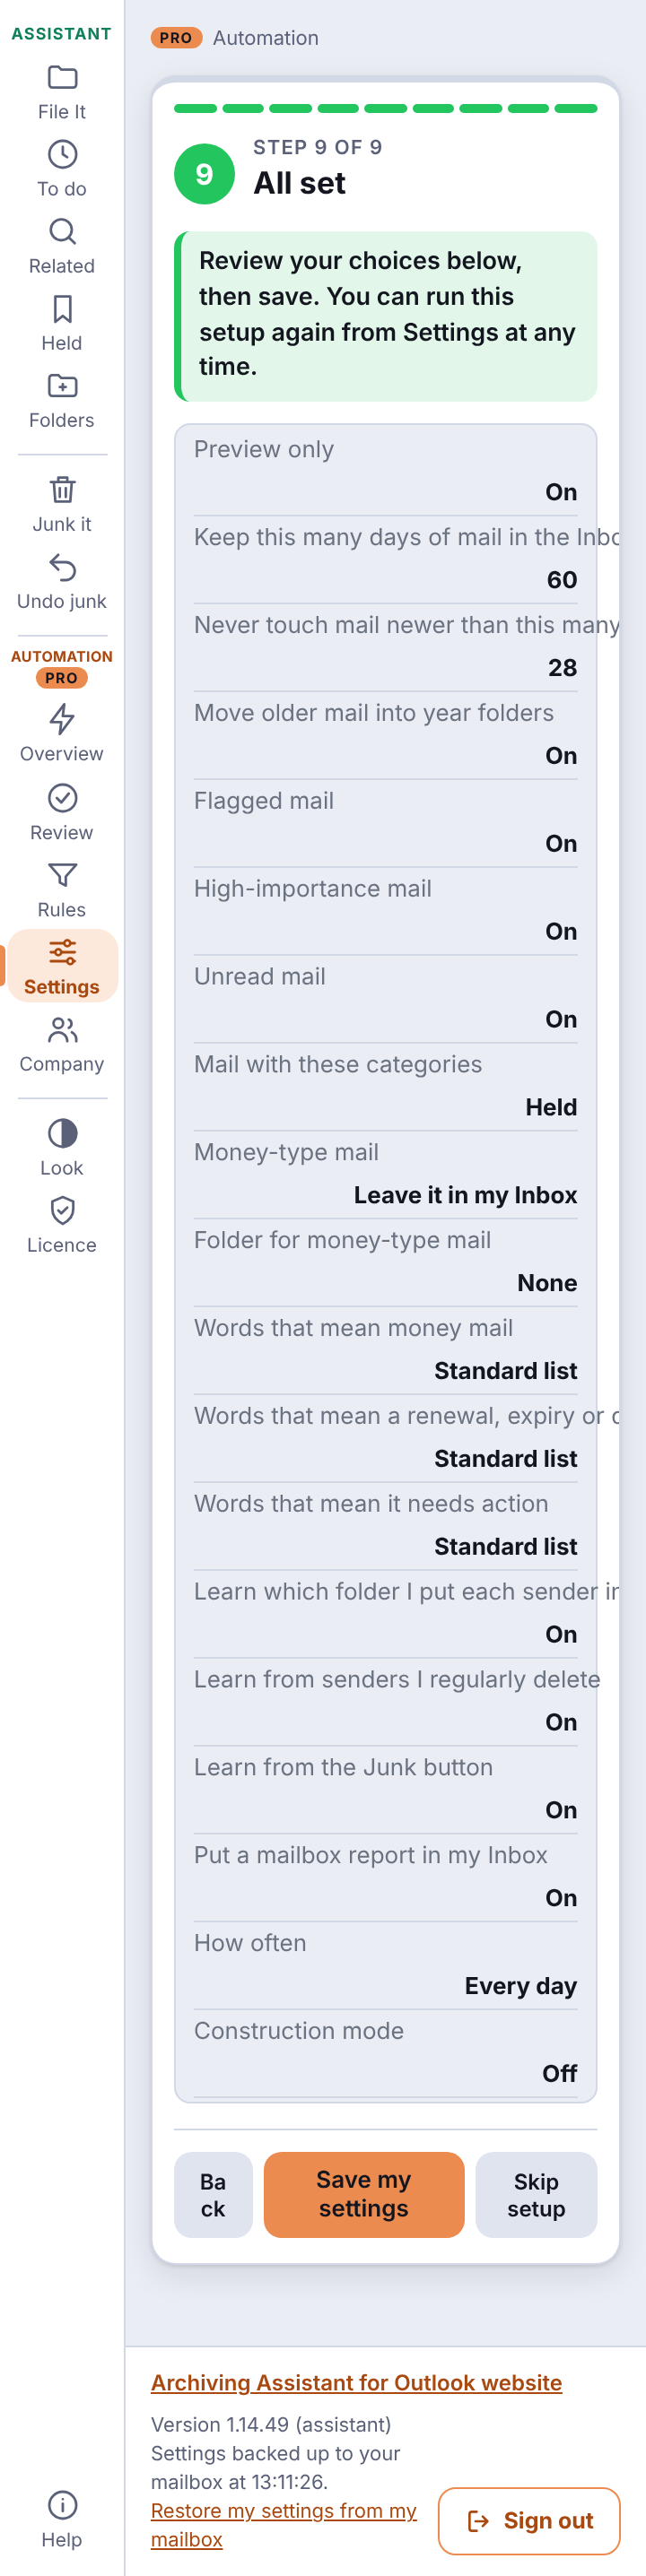
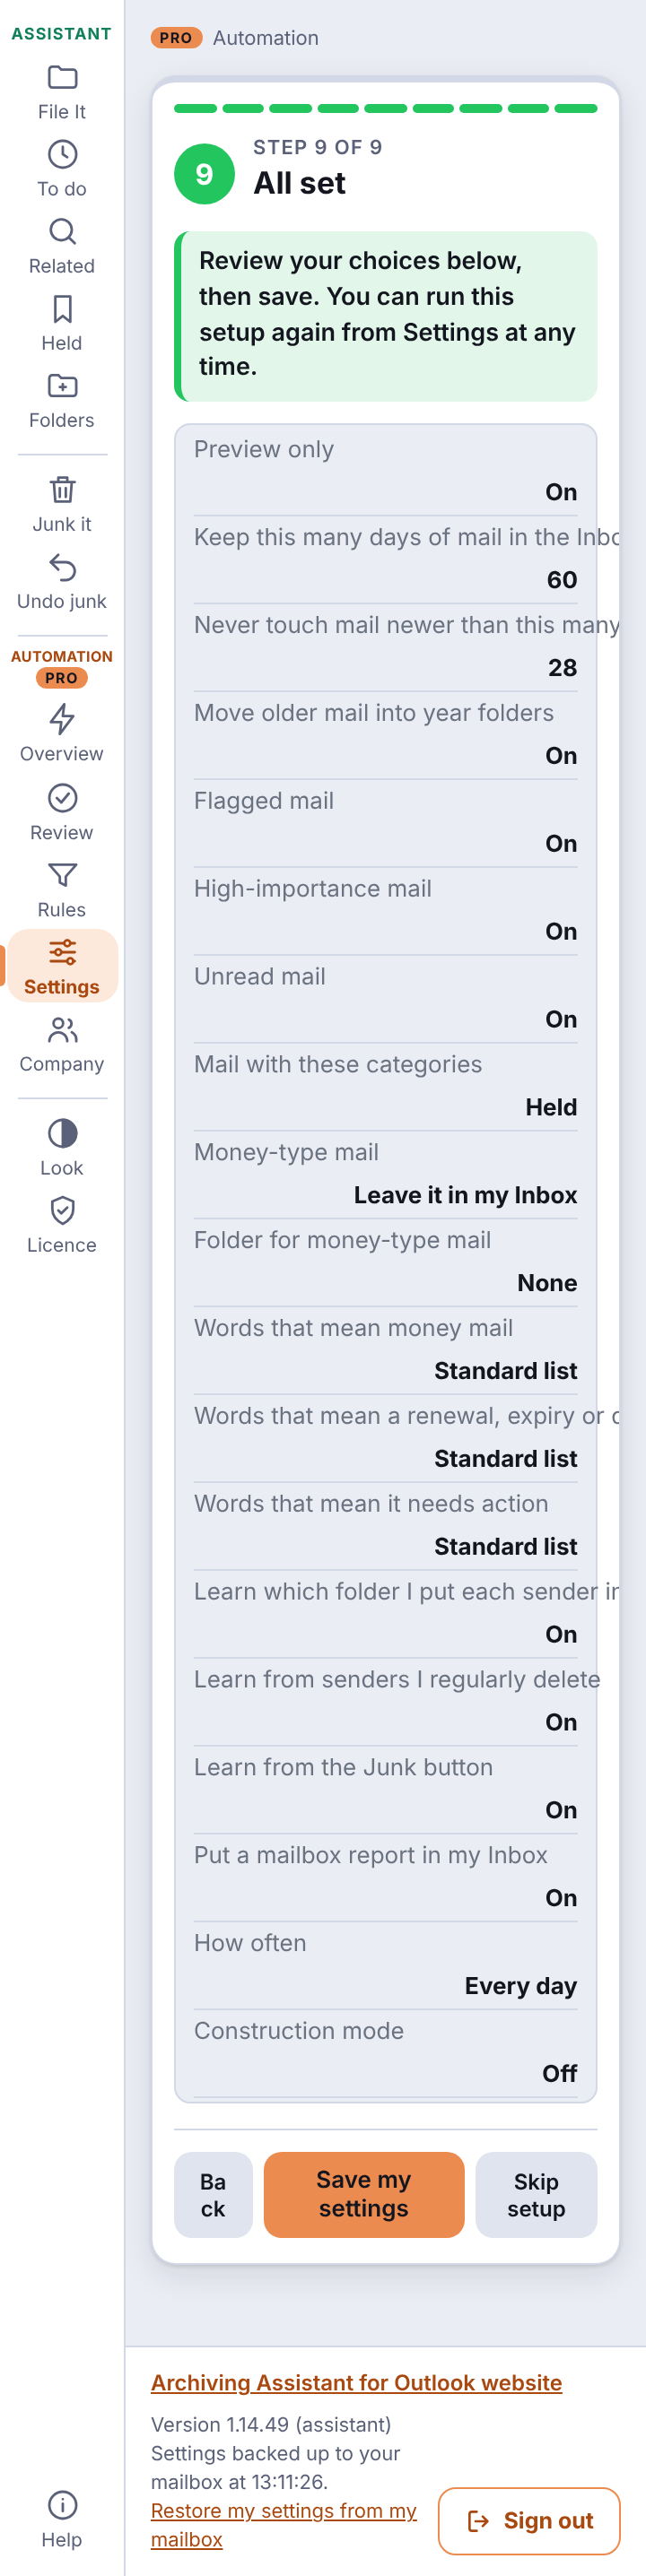
| 8 All set | Review your choices and click Save my settings. |
Afterwards the same choices are in Settings, in four tabs. Change what you like, then click Save settings.
Tidy-up
- Preview only. While this is ticked the weekly tidy only reports what it would do and moves nothing. Start here, and untick it once the reports look right.
- Keep this many days of mail in the Inbox. Newer mail always stays. 60 days is a good start.
- Never touch mail newer than this many days. An extra safety margin.
- Move older mail into year folders. Nothing is deleted.
- Always leave alone. Flagged mail, high-importance mail, unread mail, and mail with the Outlook categories you list. Mail tagged Held is always left alone.
Money and action
Archiving Assistant looks at the title (and the start of the message) for words that mean money, a renewal or a deadline, or something you need to act on. Mail like that is flagged in your report and never tidied away. You can choose whether old money mail stays in your Inbox or goes to a folder you name, and you can edit the three word lists (leave a list blank to use the standard one). Words match whole words only, so invoice also matches invoices. Use the Test an email title box to paste a title and see how your lists would read it.
Learning
- Learn which folder I put each sender in suggests filing a sender where you usually file them. It only suggests.
- Learn from senders I regularly delete proposes a delete rule for senders you keep deleting. It waits for your OK.
- Learn from the Junk button counts what you junk with the add-in towards a suggested rule.
- Under Advanced you can set how many times you must file or delete before Archiving Assistant makes a suggestion. Higher means more evidence is needed first.
Report
Switch your mailbox report on or off and choose Every day or Once a week.
Your mailbox report
If the report is on, Archiving Assistant puts a message in your own Inbox with a subject such as CogSnug Mail Archiver: mailbox report. It is created inside your mailbox and is never emailed out. It can show:
- Needs your attention. Recent mail that looks like money, a renewal or something to act on.
- Suggestions to tidy. Older mail you probably do not need in the Inbox, and where mail from a sender usually goes. Each suggestion has one-click choices on the Review page the report links to: Delete (a rule to delete mail like this), Skip (do nothing now), Protect (mail like this always stays in the Inbox) or Hold (tag just these emails Held).
- Held for more than 30 days. A reminder of mail you marked Held a while ago.
When there is nothing to look at, the report says All quiet. The report never moves, flags or deletes anything by itself. The links in it work for 7 days.
Review
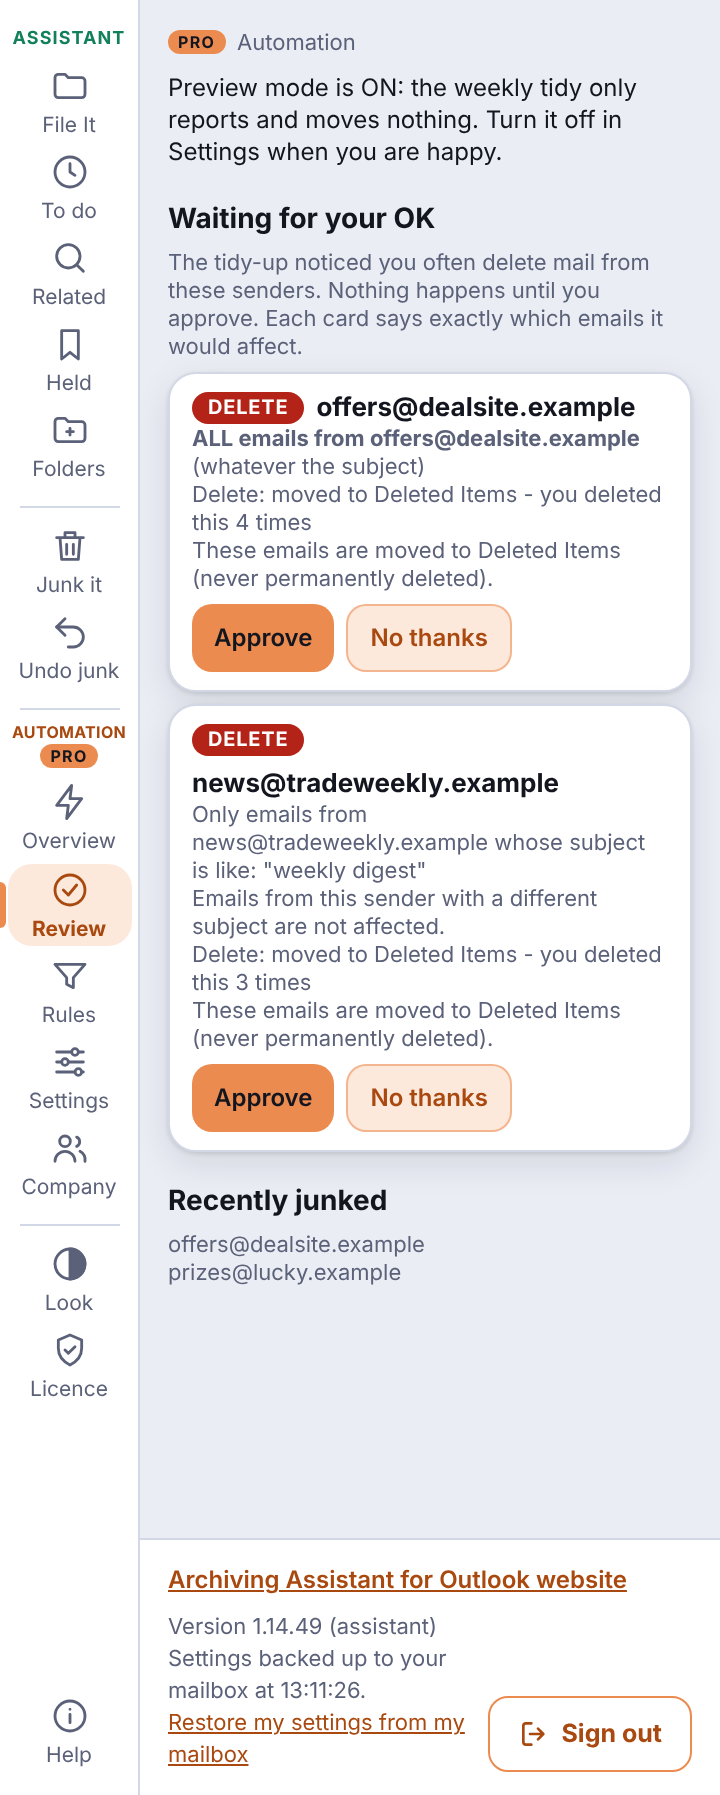
Shows what is Waiting for your OK: habits the tidy-up has noticed. Each card says exactly which emails it would affect (all emails from a sender, or only those whose subject is like some words), what it would do, and why it was suggested. Approve it and it is applied from the next weekly tidy, or choose No thanks. It also lists what you junked recently. If Preview only is on, a note at the top reminds you that nothing is being moved yet.
Rules
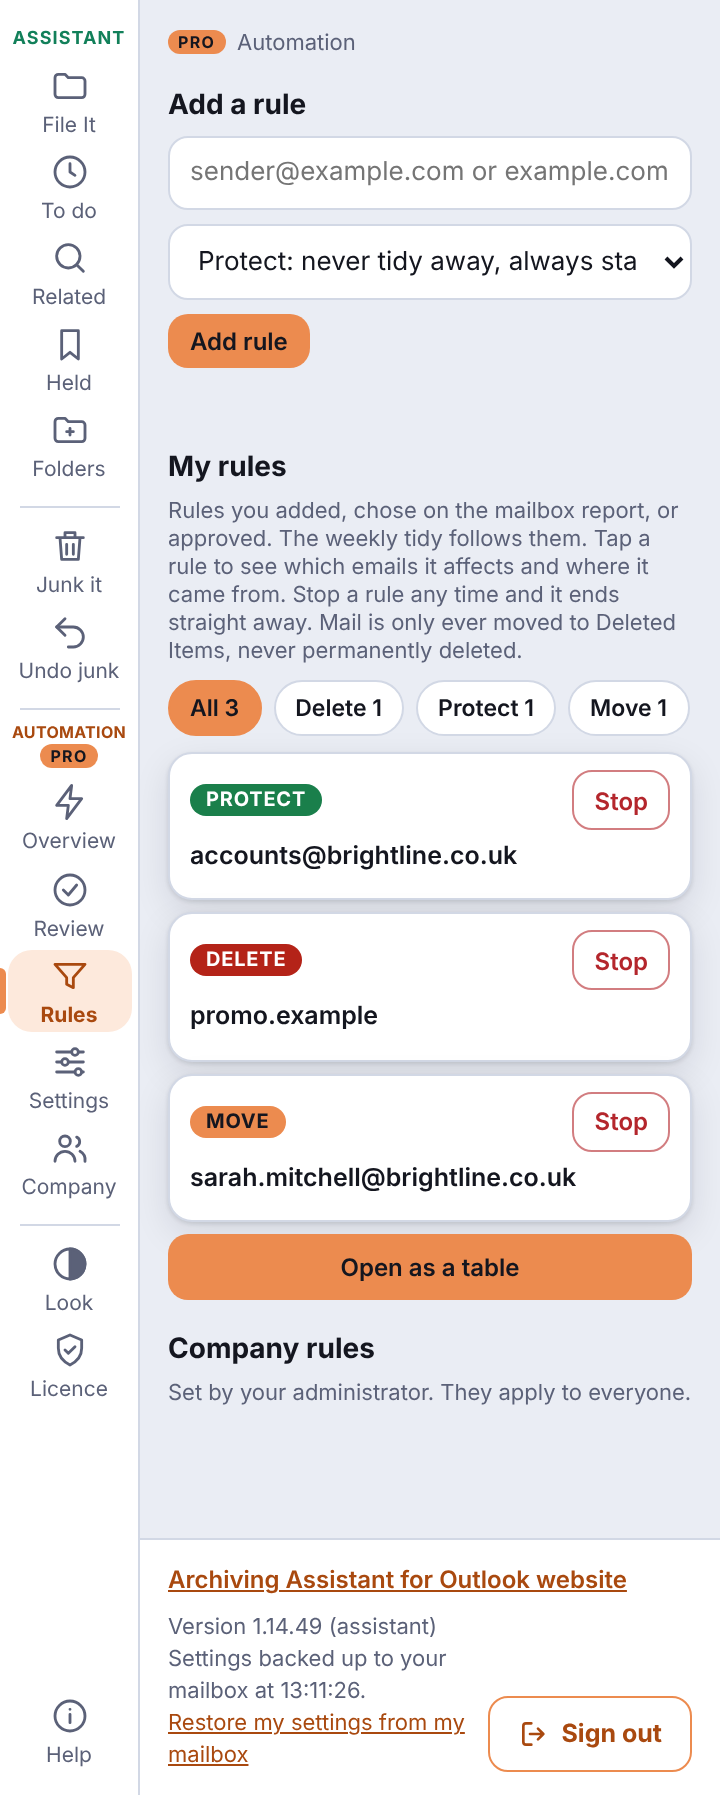
Add your own rule for a sender or a whole domain, choosing Protect (never tidied away, stays in your Inbox) or Delete (moved to Deleted Items, optionally only once the email is a number of days old). Your rules are listed under My rules, together with rules you chose from the report or approved on Review, and any Company rules your administrator set. Each card says which emails it affects, what it does and where it came from. A rule can also Move mail from a sender into a folder you chose on the report. Click Stop this rule and it ends straight away.
With many rules, use the search box and the filter chips at the top to narrow the list, and tap a rule to see its detail. Full rule names and email addresses are shown. See all opens a larger table window where you can sort and filter, tick several rules and click Stop selected. Administrators get the same table for company rules.
Company (administrators)
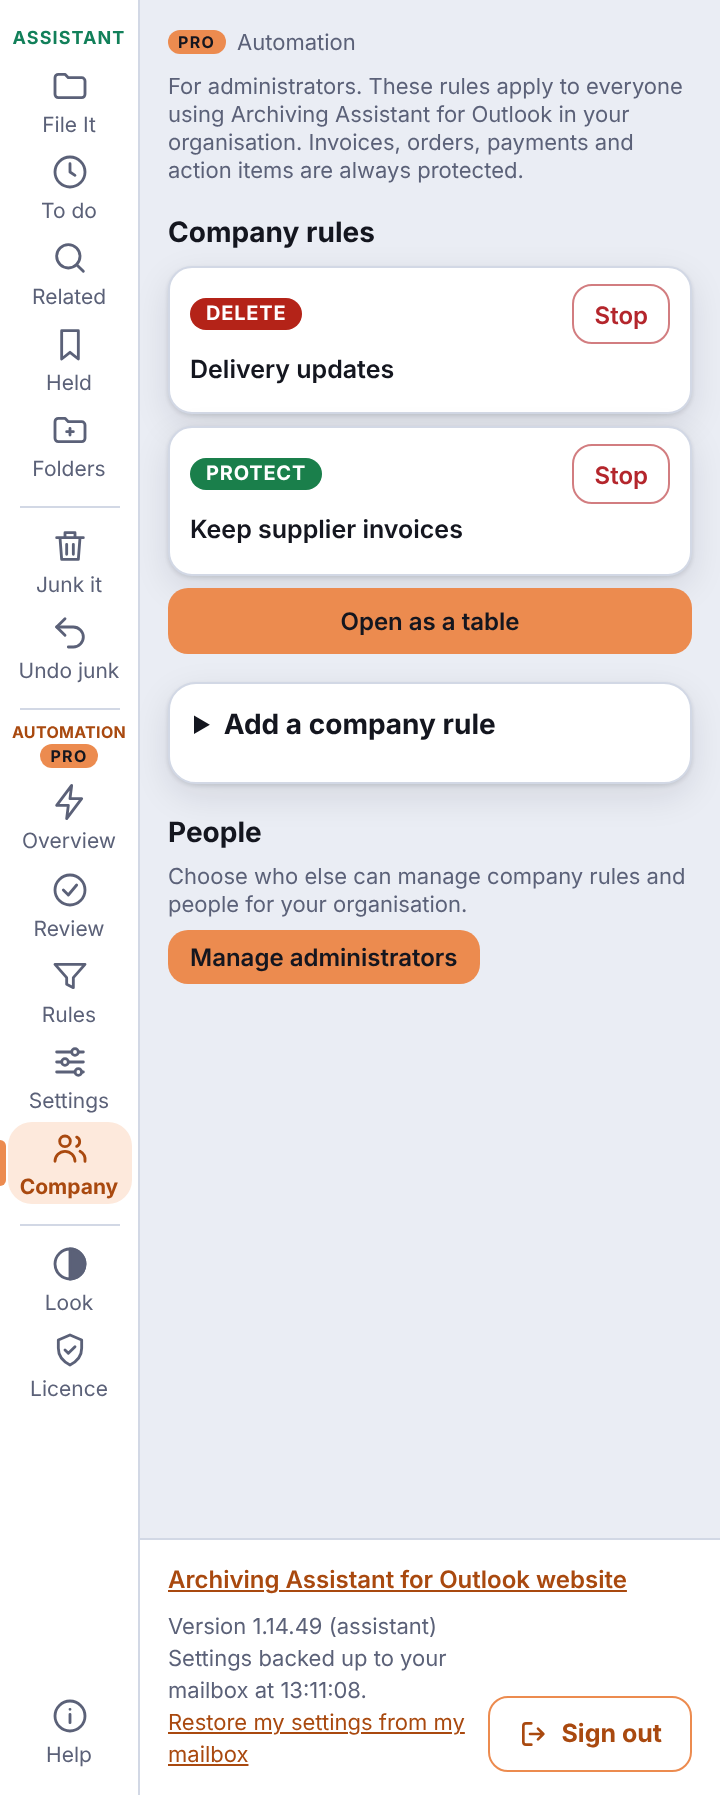
Company rules apply to everyone in your organisation, such as moving automated senders to Deleted Items, or always keeping certain senders in the Inbox.
17. Help, settings backup and the filing log
Click Help at the bottom of the rail.
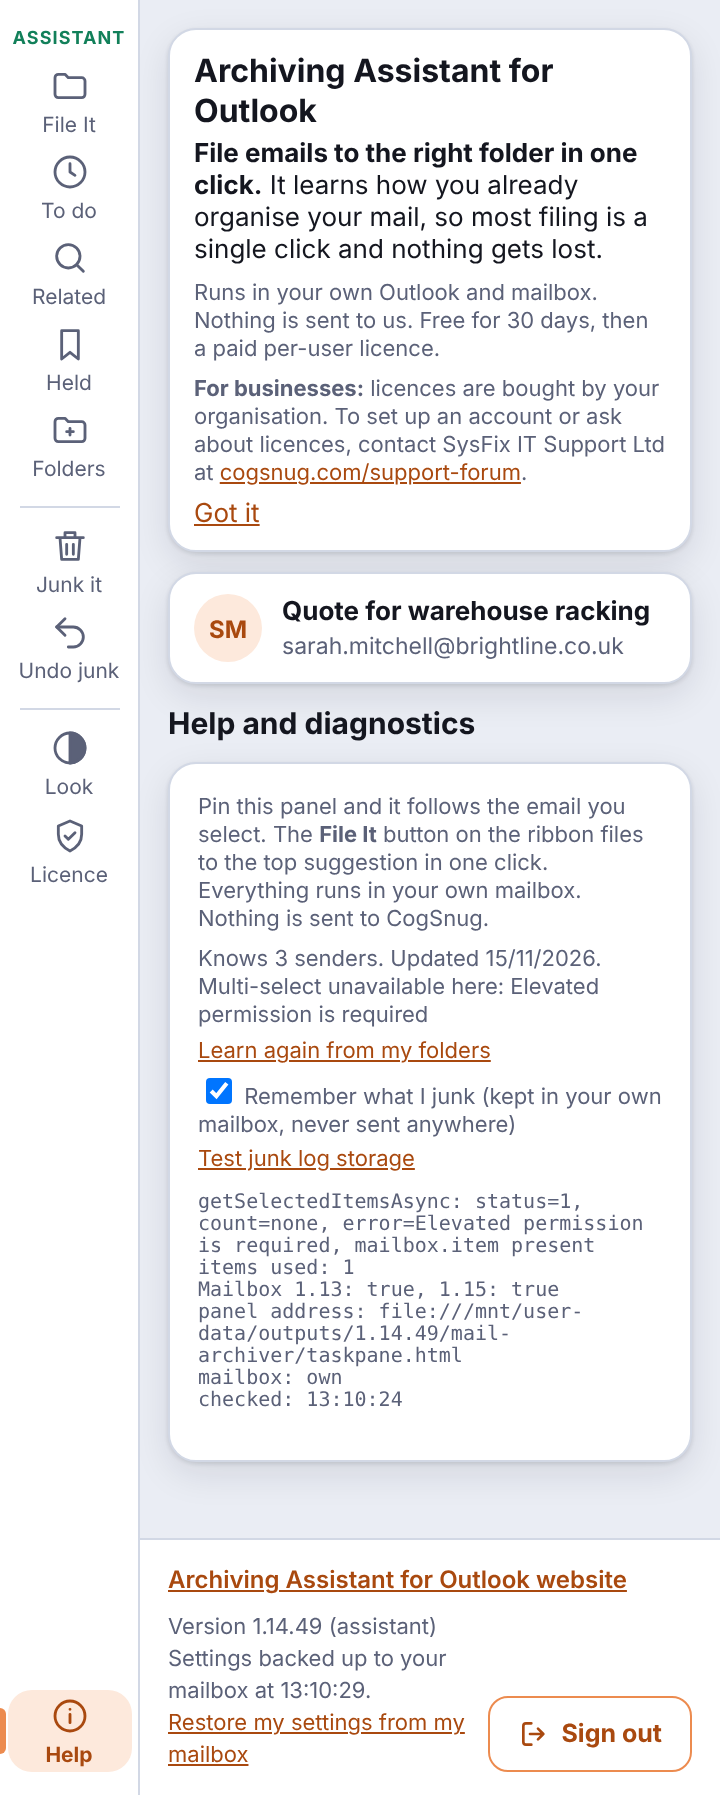
- Quick reminder of the panel.
- Learn again from my folders rebuilds what Archiving Assistant has learned from the emails in your folders now.
- Remember what I junk (ticked by default) keeps the small junk tally in your own mailbox. Untick it and nothing more is remembered. Test junk log storage checks that your mailbox can hold it.
- Download my filing log (CSV) (construction): a record of filings, saves and close-outs with the time, mailbox, job and destination. It is kept on this device only (the last 500), and is a convenience record, not a tamper-proof one.
- Sign out (always at the very bottom of the panel) signs you out of everything, including Automation, until you press Sign in with Microsoft again. The Archiving Assistant for Outlook website link and the version number are at the bottom of the panel.
- Restore my settings from my mailbox brings your backed-up settings back. A line above it says whether your settings were restored, are up to date, or no backup exists yet.
18. Troubleshooting
| The CogSnug buttons are not on my ribbon | Restart Outlook. A new add-in can take hours (up to 72) to reach everyone. Look under the three dots (…) or More apps. If it still does not appear, ask your IT administrator. |
|---|---|
| The panel does not change when I select another email | Pin the panel (the pin icon at the top of the panel). On personal Outlook.com accounts a panel cannot follow your selection, so use the CogSnug icon on the open email instead. |
| It shows twice, or an old version | Fully restart Outlook. If it persists, ask your administrator to clear Outlook's add-in cache, or on Outlook on the web clear the site data. The version number is at the bottom of the panel. |
| The folder list is empty or out of date | Click Refresh folder list. Folders you create in Outlook also show up within a minute. |
| The wrong folder is suggested | Choose the right one once. Archiving Assistant learns from it. Use Undo on a mistaken filing so it is not remembered. Or use Learn again from my folders in Help. |
| I get a Microsoft sign-in or consent message | Accept it, then press the button again. The first use of To Do or Calendar asks for permission once. |
| Multi-select shows an error | Ask your administrator to check the add-in's permissions. Archiving Assistant needs permission to read and write your mailbox. |
| My settings vanished after a reinstall | They are backed up in your mailbox. Click Restore my settings from my mailbox at the bottom of the panel. |
| I cannot save to the file server | Use Choose the server folder again, then Allow when asked. If Outlook blocks the folder chooser, use Copy the server folder path or Download as .eml. |
| The Held screen is empty, or a held email is missing | Only mail that is still in the Inbox and tagged Held is listed. Click Refresh the list. In a shared mailbox, ask the owner to create a category called Held if Hold the open email cannot. |
| Junk it says it could not move the email | The message gives the reason. In a shared mailbox you need full access to it. Click Sign in with Microsoft if it asks you to. |
| I have no mailbox report | Check that Put a mailbox report in my Inbox is ticked in Settings > Report and that you are signed in to Automation. When there is nothing to look at the report says All quiet. Reports arrive once a day or once a week, as you chose. |
| Preview only is ticked and nothing moved | That is what Preview only does. Untick it in Settings > Tidy-up when you are happy with what the reports suggest. |
| The trial has ended | See Licence and trial. |
19. Getting more help
Visit www.cogsnug.com/mail-archiving-assistant-for-outlook, or contact your IT provider, SysFix IT Support. When you contact us, please say which Outlook you use (new Outlook, classic Outlook, Outlook on the web or the mobile app) and the version number shown at the bottom of the Archiving Assistant panel.
The screenshots in this guide use sample data. Your own folders and emails will look different.